мережа
Помилки при підключенні
Помилка 650, “Сервер удаленного доступа не отвечает”:
Помилка 619, “Неправильно настроены параметры безопасности VPN соединения, VPN-трафик блокируется на пути к шлюзу, либо настройки VPN не вступили в действие”
Налаштування PPPoE-з’єднання для ОС Windows 7
Операційна система Windows 7 має вбудовану підтримку протоколу PPPoE, тому для налаштування підключення жодного додаткового програмного забезпечення встановлювати не потрібно.
Щоб налаштувати підключення за допомогою широкосмугового протоколу PPPoE (Point-to-point protocol over ethernet), Вам необхідно виконати наступні дії:
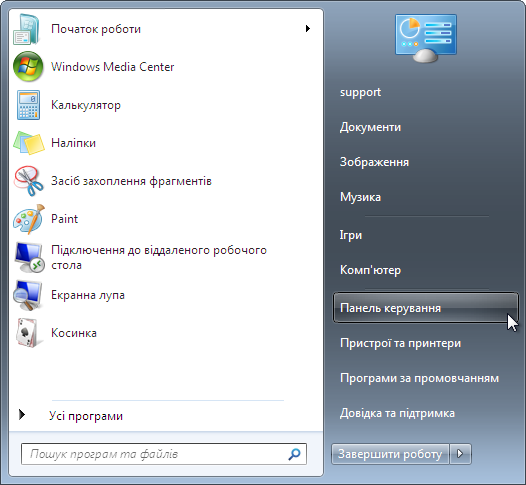
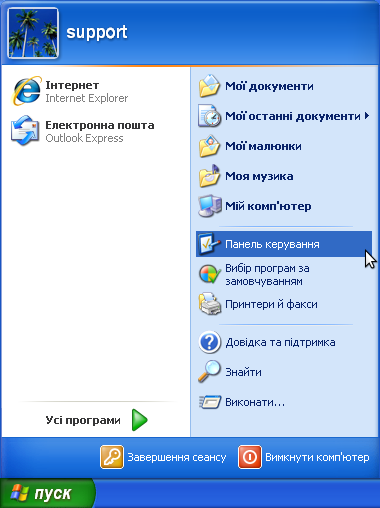
1. Відкрийте меню “Пуск” -> “Панель керування” (“Пуск” -> “Панель управления”, “Start” -> “Control panel”):
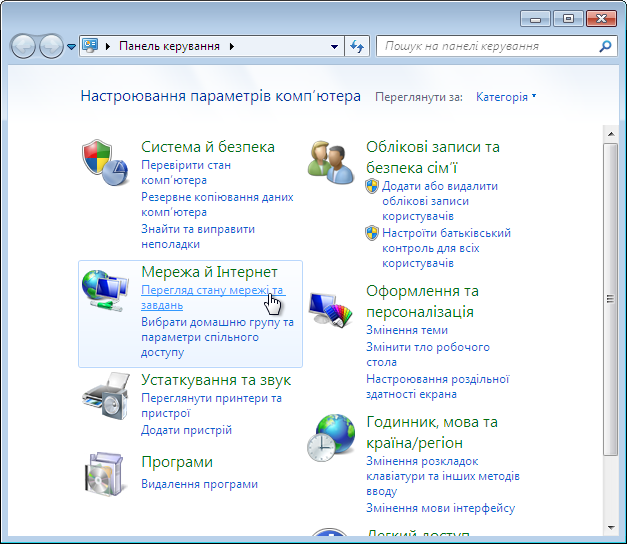
2. У вікні “Панель керування” (“Панель управления”, “Control panel”) в розділі “Мережа й Інтернет” (“Сеть и Интернет”, “Network and Internet”) оберіть пункт “Перегляд стану мережі та завдань” (“Просмотр состояния сети и задач”, “View network status and tasks”):
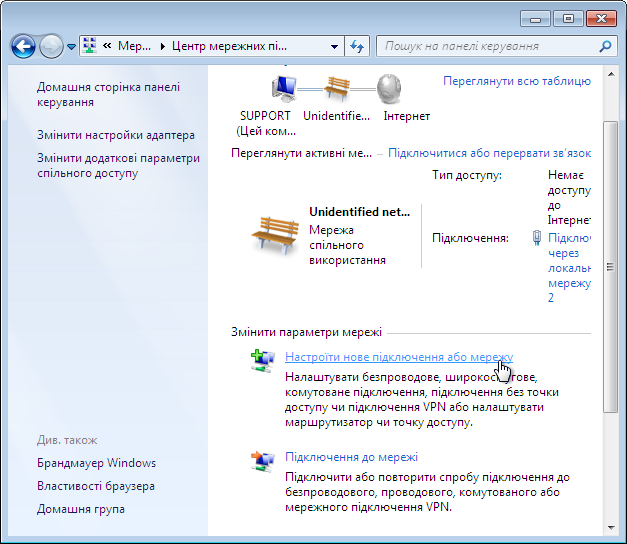
3. У вікні “Центр мережних підключень і спільного доступу” (“Центр управления сетями и общим доступом”, “Network and Sharing Center”) оберіть пункт “Настроїти нове підключення або мережу” (“Настройка нового подключения или сети”, “Set up a new connection or network”):
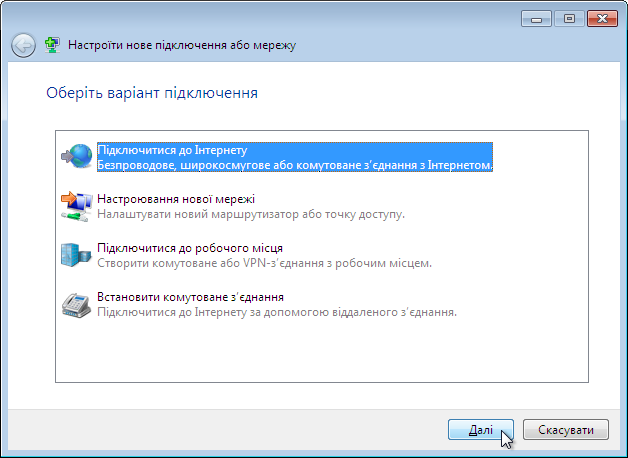
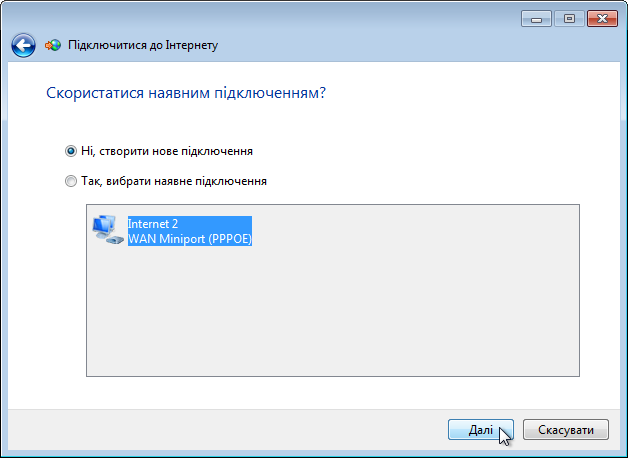
4. У діалоговому вікні “Оберіть варіант підключення” (“Выберите вариант подключения”, “Choose a connection option”) оберіть пункт “Підключитися до Інтернету” (“Подключение к Интернету”, “Connect to the Internet”) та натисніть “Далі” (“Далее”, “Next”):
* Якщо на момент створення підключення на Вашому комп’ютері існують інші PPPoE підключення до Інтернету (наприклад “Internet 2”), перед Вами з’явиться діалогове вікно “Скористатися наявним підключенням?” (“Использовать имеющееся подключение?”, “Do you want to use a connection that you already have?”). Для продовження налаштування оберіть пункт “Ні, створити нове підключення” (“Нет, создать новое подключение”, “No, create a new connection“) та натисніть“Далі” (“Далее”, “Next”):
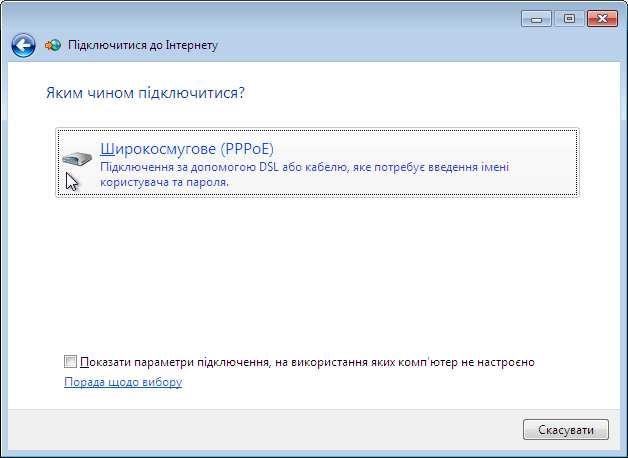
5. У діалоговому вікні “Яким чином підключитися?” (“Как выполнить подключение?”, “How do you want to connect?”) оберіть пункт “Широкосмугове (PPPoE)” (“Высокоскоростное (с PPPoE)”, “Broadband (PPPoE)”):
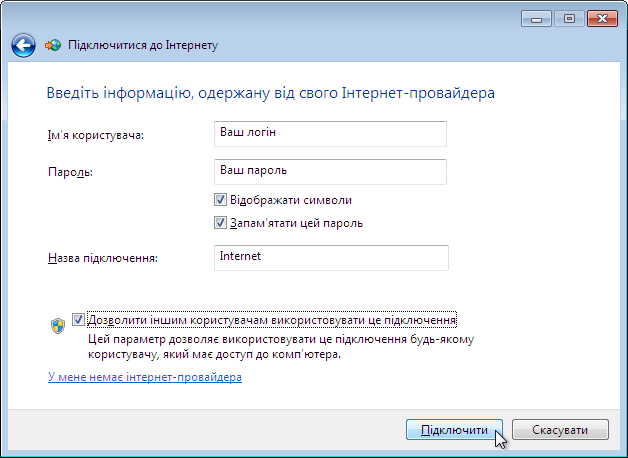
6. У діалоговому вікні “Введіть інформацію, одержану від свого Інтернет-провайдера” (“Введите информацию, полученную от поставщика услуг Интернета”, “Type the information from your Internet service provider (ISP)”) в полях “І’мя користувача” (“Имя пользователя”, “User name”) та “Пароль” (“Пароль”, “Password”) введіть логін та пароль, що надані Вам при оформленні Заяви-замовлення. В полі “Назва підключення” (“Имя подключения”, “Connection Name”) введіть довільну назву нового підключення (наприклад, “Internet”) та натисніть “Підключити” (“Подключить”, “Connect”):
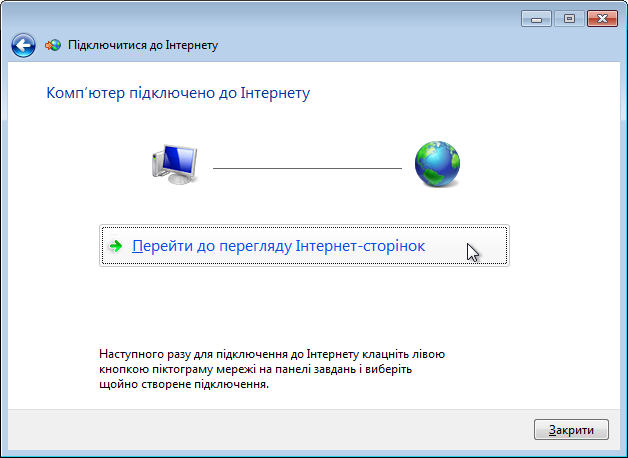
7. Якщо все було виконано правильно, підключення до Інтернету пройде успішно і перед Вами з’явиться інформаційне вікно “Комп’ютер підключено до Інтернету” (“Подключение к Интернету выполнено”, “You are connected to the Internet”), в якому Ви можете натиснути “Перейти до перегляду Інтернет сторінок” (“Приступить к обзору Интернета”, “Browse the Internet now”), після чого відкриється вікно Вашого браузера по замовчуванню, або натиснути “Закрити”(“Закрыть”, “Close”), якщо попередній варіант Вас не влаштовує:
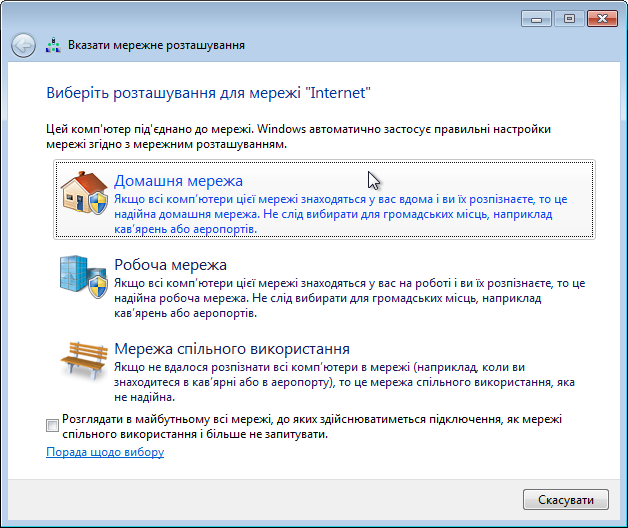
8. У випадку першого використання даного підключення додатково з’явиться вікно “Виберіть розташування для мережі “Internet” (“Выберите расположение для сети “Internet”, “Select a location for the ‘Internet’ network”) із запитом застосування мережевих параметрів до підключення. Виберіть той тип, що Вам найбільше підходить (наприклад “Домашня мережа” (“Дома”, “Home”)):
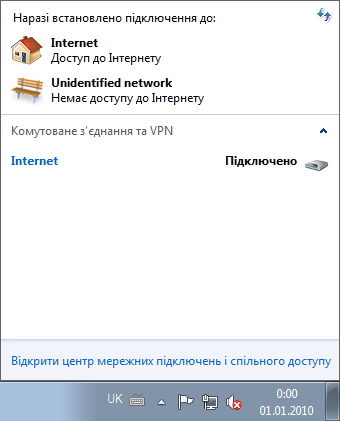
9. Керувати підключеннями на Вашому комп’ютері можна за допомогою меню “Наразі встановлено підключення до” (“Текущие подключения”, “Currently connected to”), потрапити в яке можна натиснувши лівою клавішею миші на піктограмі монітора в системному треї біля годинника. Якщо підключення до Інтернету в даний момент встановлено, піктограма“Internet” відображатиметься в цьому меню з статусом “Підключено” (“Подключено”, “Connected”):
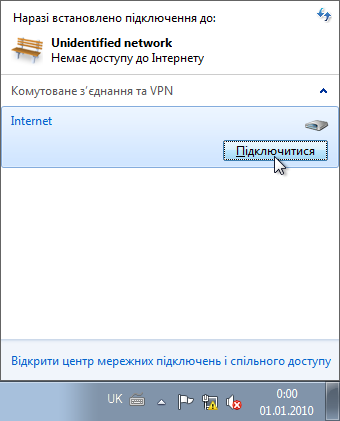
10. Наступного разу, коли Вам потрібно буде знову підключитися до мережі Інтернет, зайдіть в меню “Наразі встановлено підключення до” (“Текущие подключения”, “Currently connected to”) та натисніть “Підключитися” (“Подключение”, “Connect“) напроти підключення з назвою “Internet”:
11. Після цього з’явиться вікно “Підключення до Internet” (“Подключение к Internet”, “Connect Internet”), в якому, для підключення до мережі Internet (при умові вірно введених логіна та пароля), достатньо натиснути “Підключити” (“Подключение”, “Connect”).

Налаштування PPPoE-з’єднання для ОС Windows XP
Windows XP має вбудовану підтримку протоколу PPPoE тому, для налаштування підключення, додаткового програмного забезпечення встановлювати не потрібно.
Щоб налаштувати підключення за допомогою широкосмугового протоколу PPPoE (Point-to-point protocol over Ethernet) Вам необхідно виконати наступні дії:
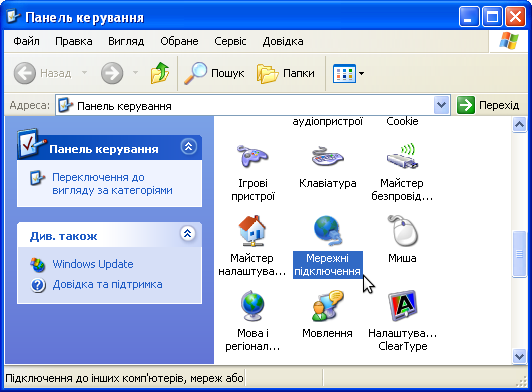
1. Відкрийте меню “Пуск” -> “Панель керування” (“Пуск” -> “Панель управления”, “Start” -> “Control panel”):
2. У вікні “Панель керування” (“Панель управления”, “Control panel”) відкрийте іконку “Мережні підключення” (“Сетевые подключения”, “Network Connections”):
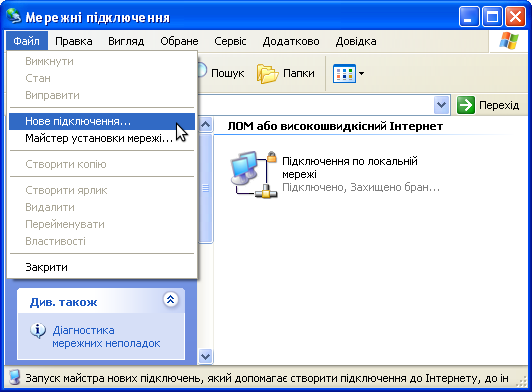
3. В головному меню вікна “Мережні підключення” (“Сетевые подключения”, “Network Connections”) відкрийте “Файл” -> “Нове підключення” (“Файл” -> “Новое подключение”, “File” -> “New Connection”):
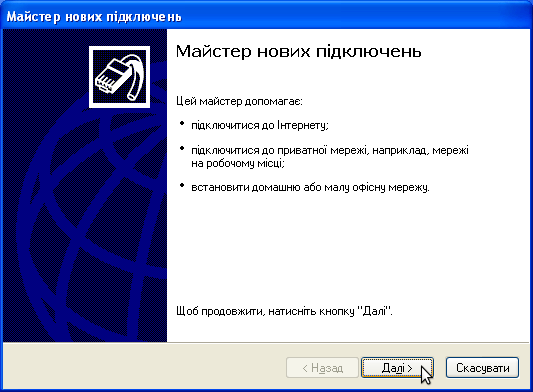
4. У діалоговому вікні “Майстер нових підключень” (“Мастер новых подключений”, “New Connection Wizard”) натисніть “Далі” (“Далее”, “Next”):
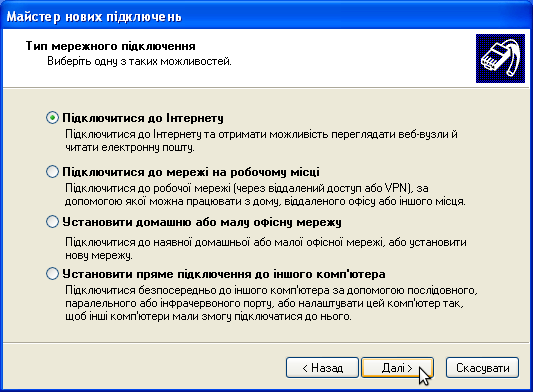
5. У діалоговому вікні “Тип мережного підключення” (“Тип сетевого подключения”, “Network Connection Type”) оберіть пункт “Підключитися до Інтернету” (“Подключить к Интернету”, “Connect to the Internet”) та натисніть “Далі” (“Далее”, “Next”):
6. У діалоговому вікні “Триває підготовка” (“Идет подготовка”, “Getting Ready”) оберіть пункт “Установити підключення вручну” (“Установить подключение вручную”, “Set up my connection manually”) та натисніть “Далі”(“Далее”, “Next”):

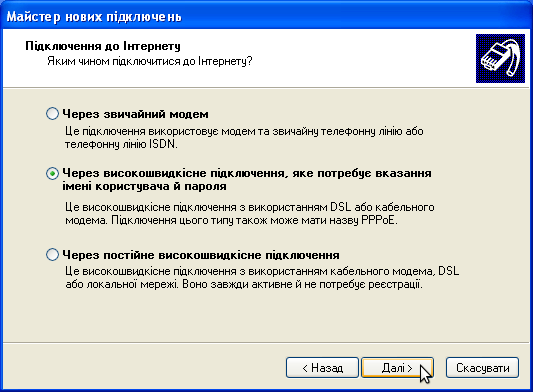
7. У діалоговому вікні “Підключення до інтернету” (“Подключение к интернету”, “Internet Connection”) виберіть пункт “Через високошвидкісне підключення, яке потребує вказання імені користувача й пароля” (“Через высокоскоростное подключение, запрашивающее имя пользователя и пароль”, “Connect using a broadband connection that requires a user name and password”) та натисніть “Далі” (“Далее”, “Next”):
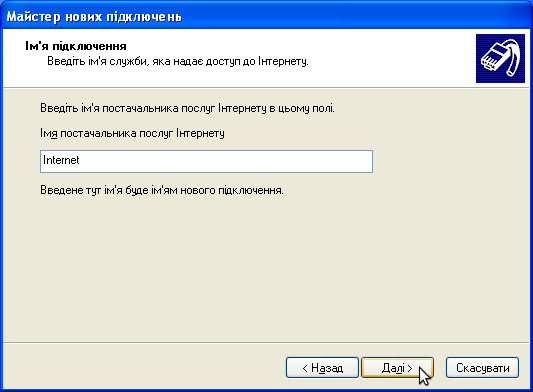
8. У діалоговому вікні “Ім’я підключення” (“Имя подключения”, “Сonnection Name”) в полі “Ім’я постачальника послуг Інтернету” (“Имя поставщика услуг”, “ISP Name”) введіть довільну назву нового підключення (наприклад, “Internet”) та натисніть “Далі” (“Далее”, “Next”):
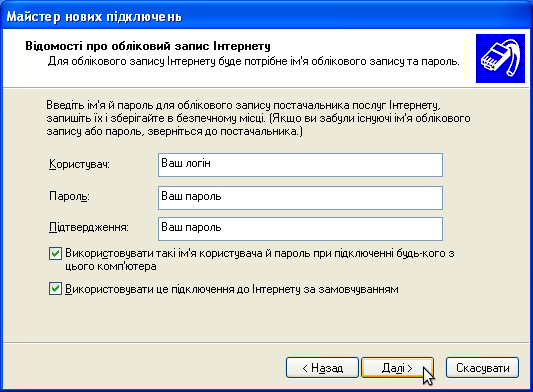
9. У діалоговому вікні “Відомості про обліковий запис Інтернету” (“Детали учетной записи в Интернете”, “Internet Account Information”) в полях “Користувач” (“Имя пользователя”, “User name”) та “Пароль” (Пароль”, “Password”) введіть логін та пароль, що надані Вам при оформленні Заяви-замовлення. В полі “Підтвердження” (“Подтверждение”, “Confirm password”) повторно введіть свій пароль та натисніть “Далі” (“Далее”, “Next”):
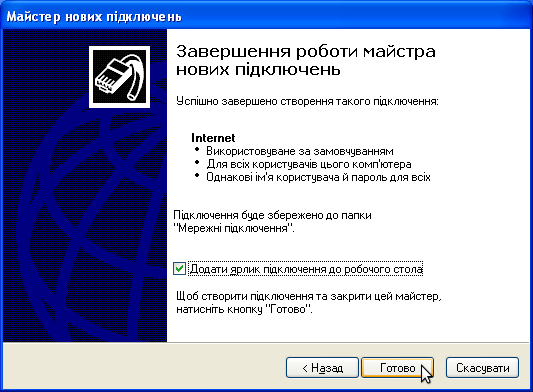
10. Далі з’явиться останнє вікно налаштувань, в якому Ви можете вибрати, чи потрібно створити іконку підключення на робочому столі. Для подальшого полегшення процесу щоденного підключення, радимо поставити галочку напроти “Додати ярлик підключення до робочого стола” (“Добавить ярлык подключения на рабочий стол”, “Add a shortcut to this connection to my desktop”) та натисніть “Готово” (“Готово”, “Finish”):
11. Після цього з’явиться вікно щойно створеного Вами Інтернет-підключення, в якому, для підключення до мережі Internet, достатньо натиснути “Підключити” (“Подключение”, “Connect”):

12. Якщо все було виконано правильно, підключення пройде успішно і в треї (системна область біля годинника) з’явиться піктограма підключення та виринаюче повідомлення типу “Internet зараз підключено” (“Internet сейчас подключен”, “Internet is now connected”).
Не вдається підключитися до домашньої мережі?
Інформація та інструкції з усунення несправностей при підключенні домашньої мережі в Windows 7.
Симптом:
![]() Стан значка підключення до бездротової мережі показує відсутність підключення
Стан значка підключення до бездротової мережі показує відсутність підключення
На карті мереж не відображається підключення до мереж або Інтернету

Якщо комп’ютер був раніше підключений домашньої мережі, однак зараз він до неї не підключений, виконайте такі дії, щоб спробувати виправити неполадку.
ПРИМІТКА. Наступні кроки передбачають, що мережа була налаштована раніше. Для отримання додаткових відомостей щодо налаштування мережі, див. розділ Налаштування простої домашньої мережі .
Перевірте з’єднання після виконання кожного кроку. Якщо проблему не усунуто, перейдіть до наступного кроку.
Крок 1: При бездротовому підключенні переконайтеся, що комп’ютер підключено до потрібної мережі
Якщо комп’ютер у минулому був підключений до мережі, він спробує повторно встановити з’єднання при виявленні бездротової мережі. Тим не менш, комп’ютер може бути підключений не до тієї мережі.
Клацніть значок Мережеве підключення ![]() в області повідомлень, щоб перевірити, підключені Чи бездротові мережі.
в області повідомлень, щоб перевірити, підключені Чи бездротові мережі.
Якщо комп’ютер підключений не до тієї мережі, клацніть рядок з ім’ям цієї мережі, потім натисніть кнопку Вимкнути. Клацніть рядок з ім’ям необхідної мережі, натисніть кнопку Підключитися.
Якщо комп’ютер підключено до потрібної мережі, переконайтеся, що налаштування безпеки відповідають потрібним параметрам і є пароль для доступу до мережі. Налаштування можна перевірити підключення в розділі Центр управління мережами і загальним доступом.
Крок 2: Перевірте підключення кабелів пристрої і скиньте налаштування пристрою модема або маршрутизатора
Виконайте наступні кроки, щоб перевірити підключення кабелів, скинути апаратне забезпечення і підключити комп’ютер до модему безпосередньо.
- Вимкніть комп’ютер.
- Від’єднайте всі кабелі, за винятком кабелів живлення, клавіатури, миші і монітора. Запишіть місце кожного кабельного з’єднання.
- Відключіть живлення маршрутизатора, кабельного / DSL-модему або комбінації маршрутизатора / модему і почекайте, поки згаснуть індикатори роботи.
- Відключіть всі кабелі від модему і маршрутизатора.
- Перевірте наявність погнутих або пошкоджених контактів на кінцях кабелів і всередині роз’ємів комп’ютера, маршрутизатора або модему. Перевірте наявність перегинів або пошкоджень в самому кабелі. Усуньте несправності кабелів з ознаками неполадки або замініть ці кабелі.
- Підключіть всі кабелі, крім шнурів живлення до модему і маршрутизатора.
- Підключіть комп’ютер до роз’єму на тильній стороні корпусу кабельного / DSL-модему або маршрутизатора за допомогою мережного кабелю (RJ45). Не проводьте кабелі поруч з динаміками і не перегинайте надлишки кабелю. По можливості використовуйте кабелі довжиною не більше 1,83 м. Переконайтеся, що для підключення маршрутизатора до комп’ютера використовується кабель відповідного типу (див. наступний малюнок).
ПРИМІТКА. Якщо використовується бездротове підключення, то його налаштування можна виконати пізніше після того, як буде встановлено, що підключення комп’ютера до Інтернет можливо по прямому мережевого кабельному з’єднанню.
Кабелі для підключення DSL-або кабельного модема до комп’ютера

1 – мережевий кабель RJ45 – Cat5/Cat6. Кабель цього типу використовується для підключення маршрутизатора / модему до мережевого порту комп’ютера.
2 – телефонний кабель RJ11. Не використовуйте цей кабель для підключення до комп’ютера.
3 – спеціальний телефонний кабель з 6 жилами. Не використовуйте кабель цього типу.
4 – кабель USB. Більшість маршрутизаторів / модемів підключаються за допомогою кабелю USB. Перш ніж використовувати кабель USB, приєднайте мережевий кабель RJ45. ЗАБОРОНЯЄТЬСЯ одночасне підключення кабелю USB і мережевого кабелю.
- Підключіть шнури живлення до модему і маршрутизатора і включіть їх.
- Почекайте, поки індикатори пристрою не стануть блимати як зазвичай або перестануть мигати. Для цього повинно знадобитися приблизно від 10 до 30 секунд. Якщо індикатор блимає дивним чином, або кілька індикаторів не горять, це є ознакою неполадки в наданні послуги Інтернет. Див опис комбінацій миготливих індикаторів в керівництві до широкосмугового пристрою й зверніться до свого провайдера у випадку виникнення неполадок.
- Після того, як індикатори на пристрої широкосмугового зв’язку замигають в нормальному режимі або будуть горіти постійно, увімкніть комп’ютер.
- Почекайте, поки Windows повністю завантажиться, після чого підключіться до Інтернету. Перейдіть на веб-вузол www.i-help.us . Якщо проблема з підключенням залишається, переходьте до наступного кроку.
Крок 3: Запустіть засіб “Діагностика мереж Windows”
Windows 7 контролює підключення до мережі та Інтернет. При виявленні неполадки відобразиться повідомлення про відсутність з’єднання або обмеженому підключенні і буде запитано дозвіл користувача на виконання діагностики неполадки. Натисніть OK, щоб дозволити Windows 7 виконати діагностику і відновити з’єднання.
Щоб вручну запустити діагностику, виконайте одну з таких дій:
Варіант 1
Клацніть правою кнопкою миші значок Мережеве підключення ![]() в області сповіщень на панелі завдань і виберіть пункт Усунення неполадок. Засіб діагностики мережі Windows виконає перевірку системи на наявність несправностей.
в області сповіщень на панелі завдань і виберіть пункт Усунення неполадок. Засіб діагностики мережі Windows виконає перевірку системи на наявність несправностей.
Усунення несправностей

Варіант 2
Натисніть кнопку Пуск ( ![]() ) І введіть мережу і загальний доступ в полі Знайти програми та файли. У результатах клацніть значок Центр управління мережами і загальним доступом.
) І введіть мережу і загальний доступ в полі Знайти програми та файли. У результатах клацніть значок Центр управління мережами і загальним доступом.
Запуск “Центру управління мережами і загальним доступом” з меню Пуск

Варіант 3
У Центрі управління мережами і загальним доступом клацніть символ у вигляді жовтого знака оклику ![]() або хреста червоного кольору
або хреста червоного кольору ![]() в області “Стан мережі”, щоб запустити засіб “Діагностика мережі Windows”.
в області “Стан мережі”, щоб запустити засіб “Діагностика мережі Windows”.
Стан мережі
Крок 4: Використовуйте засіб виправлення неполадок мережі та Інтернет
У Центрі управління мережами і загальним доступом в Windows 7 є засіб усунення неполадок мережі та інтернету, яке виконує перевірку на наявність несправностей в мережі і, якщо необхідно, виконує автоматичну корекцію програмних підключень. Використовуйте цей інструмент для перевірки та виправлення помилок підключення наступним чином:
- У Центрі управління мережами і загальним доступом клацніть пункт Усунення неполадок.
Усунення несправностей

Відкриється вікно програми “Засіб усунення неполадок мережі та Інтернет”.
Засіб усунення неполадок мережі та Інтернет

- Натисніть кнопку Підключення до Інтернет, щоб перевірити з’єднання з Інтернет.
- Щоб перевірити систему на наявність несправностей, дотримуйтесь інструкцій на екрані.
- Якщо проблема усунена, подальші дії не потрібні.
Якщо проблему не усунуто, поверніться в розділ “Засіб усунення неполадок мережі та Інтернет” та натисніть кнопку Мережевий адаптер, щоб перевірити адаптер.
Крок 5: У вікні “Диспетчер пристроїв” перевірте, чи включені адаптери мережі
- Натисніть кнопку Пуск (
 ) І введіть Диспетчер пристроїв в полі Знайти програми та файли. У результатах пошуку знайдіть і клацніть пункт Диспетчер пристроїв.
Відкриття вікна “Диспетчер пристроїв” з меню “Пуск”

- Двічі клацніть значок Мережеві адаптери.
Диспетчер пристроїв – Мережеві адаптери

- Перевірте стан апаратного забезпечення локальної мережі.
- Якщо поряд із значком мережевої карти є стрілка (
 ), Це означає, що даний пристрій відключено. Клацніть правою кнопкою миші рядок з ім’ям мережевого пристрою і виберіть пункт Увімкнути.
Включення апаратного забезпечення локальної мережі

ПРИМІТКА. Якщо плата локальної мережі не вказана в списку, виберіть у меню Дія пункт Оновити конфігурацію устаткування. Якщо мережева плата як і раніше не вказана в списку, перезавантажте комп’ютер, потім поверніться у вікно “Диспетчер пристроїв”. Windows 7 автоматично виявить пристрої та встановить драйвери при запуску системи.
- Після включення апаратного забезпечення локальної мережі перевірте підключення до мережі. Якщо підключення все ще не вдається встановити, спробуйте скористатися наступними корисними порадами, а також зробити кроки для усунення симптому Низька швидкість з’єднання або розриви підключення .
Інші дії:
- Перевстановіть оригінальне ПЗ та драйвери мережевих адаптерів комп’ютера.
- Перевірте налаштування брандмауера, щоб переконатися, що для оглядача відкритий доступ в мережу.
- Підключіть до мережі інший комп’ютер, щоб перевірити, чи відноситься неполадка тільки до одного ПК.
- Перевірте веб-сайти постачальників комп’ютера, мережевий плати, модему та / або маршрутизатора на наявність оновлень мікропрограмного забезпечення або драйверів.
- Зв’яжіться з представником постачальника послуг Інтернету або виробником модему, щоб проконсультуватися про додаткові заходи пошуку та усунення несправностей.
- Скиньте налаштування маршрутизатора до заводських. Більш детальна, що відноситься до конкретної моделі, інформація наведена в Посібнику користувача, що додається до маршрутизатора.
Не вдається підключитися до Інтернету?
Тут ми розміщуємо інструкції щодо діагностики та усунення несправностей підключення до Інтернету за допомогою домашньої мережі в Windows 7.
Симптоми несправності:
![]() Стан значка підключення до бездротової мережі – підключений до мережі, відсутній доступ до Інтернету
Стан значка підключення до бездротової мережі – підключений до мережі, відсутній доступ до Інтернету
Карта мережі не показує наявності доступу до Інтернету:
![]()
При спробі перегляду веб-сторінок відображаються повідомлення про помилки
o У вікні Internet Explorer неможливий перегляд ні однієї веб-сторінки.
o Автономний режим: З’єднання з Інтернетом недоступне.
o Відсутній підключення: Ви не підключені до жодної мережі.
Якщо комп’ютер може підключатися до мережі, але не до Інтернету, виконайте такі дії. Перевіряйте підключення до Інтернету після кожного кроку. Якщо проблему не усунуто, перейдіть до наступного кроку.
ПРИМІТКА. Виконання цих дій припускає, що мережа була налаштована раніше і є договір з постачальником послуг Інтернету. Для отримання додаткових відомостей щодо налаштування мережі, див. розділ Налаштування простої домашньої мережі .
Крок 1: При бездротовому підключенні переконайтеся, що комп’ютер підключено до потрібної мережі
Якщо комп’ютер у минулому був підключений до мережі, він спробує повторно встановити з’єднання при виявленні бездротової мережі. Тим не менш, комп’ютер може бути підключений не до тієї мережі.
Щоб визначити, з якою мережею встановлене з’єднання, а також вибрати потрібну мережу, виконайте такі дії:
Клацніть значок Мережеве підключення ![]() в області повідомлень, щоб перевірити, підключені Чи бездротові мережі.
в області повідомлень, щоб перевірити, підключені Чи бездротові мережі.
Якщо комп’ютер підключений не до тієї мережі, клацніть рядок з ім’ям цієї мережі, потім натисніть кнопку Вимкнути. Клацніть рядок з ім’ям необхідної мережі, натисніть кнопку Підключитися.
Після підключення комп’ютера до необхідної мережі перевірте наявність доступу в Інтернет.
Крок 2: Спробуйте запустити Internet Explorer без надбудов
Визначте, чи є джерелом несправностей зовнішні програми або вбудовувані модулі. Відкрийте Internet Explorer для тестування без вбудованих модулів:
- Натисніть Пуск ( ) І введіть команду add в області “Пошук програм та файлів”, потім клацніть рядок Internet Explorer (без вбудованих модулів).
Меню “Пуск” з посиланням на Internet Explorer (без вбудованих модулів)

- У вікні Internet Explorer відобразиться сторінка з текстом “Всі надбудови Internet Explorer відключені”.
- Введіть www.i-help.us в адресний рядок браузера та натисніть Enter.
- Виберіть одне з наступних дій в залежності від того, що відображається у вікні Internet Explorer:
Варіант 1
Якщо у вікні Internet Explorer відобразиться небудь веб-сторінка, комп’ютер підключений до Інтернет, і джерелом неполадок є один або кілька вбудованих модулів. Для усунення цієї неполадки, можливо, буде потрібно знайти і видалити шпигунське ПЗ (spyware), і видалити всі недавно встановлені рекламні програми (adware) і доповнення браузера.
Варіант 2
Якщо в Internet Explorer не відображаються веб-сторінки, або комп’ютер починає спроби набору номера для з’єднання, продовжуйте виконувати подальші кроки.
Крок 3: Скидання параметрів Інтернету
Для підготовки Windows до усунення несправностей і рішенню більшості проблем, пов’язаних з навігацією по Інтернет, виконайте скидання налаштувань Інтернет наступним чином:
- Закрийте всі вікна Internet Explorer.
- Натисніть кнопку Пуск ( ), Виберіть пункт Панель керування, потім Мережа й Інтернет.
Мережа та Інтернет

- Виберіть пункт Властивості оглядача.
Відкриється вікно “Властивості оглядача”.
- Клацніть вкладку Додатково та натисніть кнопку Скинути.
Кнопка “Скидання” на вкладці “Додатково” у вікні “Властивості оглядача”

Відкриється вікно “Скидання налаштувань Internet Explorer”.
- Прочитайте інформацію на екрані, встановіть прапорець у полі Видалити особисті настройки та натисніть Сброс.
Скидання установок Internet Explorer

- Після того, як Windows виконає скидання установок Internet Explorer, натисніть кнопку Закрити.
- Спробуйте підключитися до Інтернет і перейти на веб-сайт www.i-help.us . Якщо проблему не усунуто, перейдіть до наступного кроку.
Крок 4: Перевірте підключення кабелів пристрої і скиньте налаштування пристрою модема або маршрутизатора
Виконайте наступні кроки, щоб перевірити підключення кабелів, скинути апаратне забезпечення і підключити комп’ютер до модему безпосередньо.
- Вимкніть комп’ютер.
- Від’єднайте всі кабелі за винятком кабелю живлення, клавіатури, миші і монітора. Запам’ятайте роз’єми, до яких був підключений кожен з кабелів.
- Відключіть живлення маршрутизатора, кабельного / DSL-модему або комбінації маршрутизатора / модему і почекайте, поки згаснуть індикатори роботи.
- Відключіть всі кабелі від модему і маршрутизатора.
- Перевірте наявність погнутих або пошкоджених контактів на роз’ємах кабелів і комп’ютера, маршрутизатора або кабельного модема. Перевірте наявність перегинів або пошкоджень в самому кабелі. Усуньте несправності кабелів з ознаками неполадки або замініть ці кабелі.
- Підключіть всі кабелі, крім шнурів живлення до модему і маршрутизатора.
- Підключіть комп’ютер до роз’єму на тильній стороні корпусу кабельного / DSL-модему або маршрутизатора за допомогою мережного кабелю (RJ-45). Не проводьте кабелі поруч з динаміками і не перегинайте надлишки кабелю. Якщо можливо, використовуйте кабелі довжиною 1,83 метрів або менше. Переконайтеся, що для підключення маршрутизатора до комп’ютера використовується кабель відповідного типу (див. наступний малюнок).
ПРИМІТКА. Якщо використовується бездротове підключення, то його налаштування можна виконати пізніше, після того, як буде встановлено, що підключення комп’ютера до Інтернету можливо за прямим мережевого кабельному з’єднанню.
Кабелі для підключення DSL-або кабельного модема до комп’ютера
1 – мережевий кабель RJ45 – Cat5/Cat6. Кабель цього типу використовується для підключення маршрутизатора / модему до мережевого порту комп’ютера.
2 – телефонний кабель RJ11. Не використовуйте цей кабель для підключення до комп’ютера.
3 – спеціальний телефонний кабель з 6 жилами. Не використовуйте кабель цього типу.
4 – кабель USB. Більшість маршрутизаторів / модемів підключаються за допомогою кабелю USB. Перш ніж використовувати кабель USB, приєднайте мережевий кабель RJ45. ЗАБОРОНЯЄТЬСЯ одночасне підключення кабелю USB і мережевого кабелю.
- Під’єднайте шнур живлення до модему і маршрутизатора і включіть їх.
- Почекайте, поки індикатори пристрою не стануть блимати як зазвичай або перестануть мигати. Для цього повинно знадобитися приблизно від 10 до 30 секунд. Якщо індикатор блимає дивним чином, або кілька індикаторів не горять, це є ознакою неполадки в наданні послуги Інтернет. Див опис комбінацій миготливих індикаторів в керівництві до широкосмугового пристрою й зверніться до свого провайдера у випадку виникнення неполадок.
- Після того, як індикатори на пристрої широкосмугового зв’язку замигають в нормальному режимі або будуть горіти постійно, увімкніть комп’ютер.
- Почекайте, поки Windows повністю завантажиться, після чого підключіться до Інтернету. Перейдіть на веб-вузол www.i-help.us . Якщо неполадки з підключенням не вдається усунути, спробуйте скористатися наступними корисними порадами, після чого перейдіть в розділ Не вдається підключитися до домашньої мережі .
Інші дії:
- Перевірте налаштування брандмауера, щоб переконатися, що для оглядача відкритий доступ в мережу.
- Підключіть до мережі інший комп’ютер, щоб перевірити, чи відноситься неполадка тільки до одного ПК.
- Зв’яжіться з представником постачальника послуг Інтернету або виробником модема, щоб проконсультуватися про додаткові заходи пошуку та усунення неполадок.
- Скиньте налаштування маршрутизатора до заводських. Більш детальна, що відноситься до конкретної моделі, інформація наведена в Посібнику користувача, що додається до маршрутизатора.
Також можемо вам запропонувати послугу: Налаштування WiFi-роутерів . Наші спеціалісти допоможуть віддалено налаштувати ваш WiFi роутер та підкажуть оптимальні параметри для його роботи та безпеки.
Як обжать виту пару?
 Порядок розведення проводів кручений пари для роз’ємів RJ-45 залежить від призначення сполучної лінії, технології і стандарту передачі даних. Нижче наведені малюнки для локальних обчислювальних мереж Ethernet для стандартів використовують мідний кабель – кручені пари (Twisted Pair). Абрівіатура таких стандартів як правило має вигляд # # # # # – TX (наприклад, 10Base-TX, 100Base-TX) Цифра в назві стандарту говорить про несучій частоті передачі даних. Для кожного стандарту використовуються спеціальні схеми обтиску кабелю, використовуються різні кабелі, застосовуються специфічні обмеження по довжині кабелю і кількості з’єднувачів і комутуючих пристроїв.
Нижче представлений щодо універсальний спосіб обтиску
Для 10Base-TX і 100Base-TX задіяні лише помаранчеві та зелені проводки (контакти 1 +2 і 3 +6). Синю пару часто використовують для телефонних ліній (контакти 4 +5). Для технологій 1000Base-TX і ряду інших менш популярних задіяні всі 8 контактів, також для Gigabit технологій рекомендую використовувати екрануванню виту пару.
 1. Прямий порядок обтиску витої пари, що веде від робочої станції до концентратора.

2. Крос-Лінковий (перехресний) порядок обтиску витої пари.
Застосовується у випадку, коли потрібно з’єднати між собою 2 концентратора, що не мають перемикання uplink / normal, а також для прямого з’єднання 2-х комп’ютерів. Міняються місцями 2 пари: 1-2 на 3-6. Десь з 2004 року пристрої навчилися автоматично переставляти пари місцями і кросовий обтиск втратив сенс.

В мережеві розетки дроти заводяться теж в залежності від використовуваного стандарту. Їх контакти пронумеровані тим чи іншим способом.
При зачистці кабелю, розплітання витих пар не має перевищувати 12,5 мм, тому бажано використовувати спеціальні кліщі, в яких є ножі з обмежувачами. Не треба, так само, знімати ізоляцію з кожного з проводів.
Вам необхідна допомога комп'ютерного фахівця? Проблеми з комп'ютером або ноутбуком? Наша компанія надає широкий спектр послуг. Обслуговування комп'ютерів і комп'ютерна допомога в Закарпатті та м.Ужгороді. Будь-який ремонт і налаштування комп'ютерів, ноутбуків і локальних мереж.

