blog
What is Licensing?
Програмне забезпечення, подібно до інших об’єктів інтелектуальної власності, таких, як музичні та літературні твори, захищене від несанкціонованого копіювання законами про авторські права. Закони про авторські права передбачають збереження за автором програмного забезпечення деяких виключних прав, одне з яких — право на виробництво копій програмного забезпечення.
При придбанні програмного забезпечення ви, насправді, придбаєте ліцензію, яка дає вам право на використання цього ПЗ. Умови використання програмного забезпечення (наприклад, можливість переносу на інший ПК, право використання попередніх версій) фіксуються в угоді, яка супроводжує поставку продукту. Найрозповсюдженіший варіант такої угоди — «Ліцензійна угода кінцевого користувача». Вона супроводжує продукти, що постачаються разом з новими комп’ютерами (OEM) або окремо в роздрібному продажу (коробкова версія) і частіше за все доступна в електронному вигляді та відображається під час першого запуску продукту. Користвач повинен погодитися з її умовами перед встановленням програмного забезпечення. Ознайомитися з правилами використання деяких OEM або коробкових версій програмного забезпечення до його придбання можна на сторінці Приклади ліцензійних угод.
Якщо продукт придбано за однією з програм корпоративного ліцензування, то діють права використання програмного забезпечення Microsoft, наведені в документах «Ліцензійні права на використання продуктів Microsoft» та «Список продуктів Microsoft». Ці документи разом з текстом корпоративної угоди, в межах якої придбавається ПЗ, визначають умови використання такого програмного забезпечення.
There are three main ways to buy licenses to products of Microsoft:
 |
Korobkova license (FPP) - contains the disk in a color box, user manual and certificate of authenticity sticker (COA). |
 |
OEM-license (Original Equipment Manufacturer) - software license for sale with new computer equipment. |
 |
Програми корпоративного ліцензування — найвигідніший спосіб придбання ПЗ Microsoft для організацій. Корпоративне ліцензування передбачає значні знижки, полегшене розгортання і використання ПЗ, та дозволяє і дозволяють прийняти до уваги розмір компанії та інші особливості Вашого бізнесу. |
Для більшості ліцензій на продукти Microsoft Ви можете обрати опцію програми підтримки Software Assurance що дозволить Вам отримати максимум від інвестицій в програмне забезпечення. Програма підтримки Software Assurance надає можливість безкоштовного переходу на нові версії ПЗ, переміщення ліцензій, розстрочку платежів, послуги з планування та розгортання ПЗ, технічну підтримку 24х7, тренінги, онлайн-навчання, служби підписки TechNet та безліч інших переваг, що значно полегшують роботу та зменшують витрати організації. Детальну інформацію про ці та інші можливості Ви можете знайти на сторінці переваг Software Assurance
The license rights are generally different for different categories of products.
Most license agreements prohibit the transfer of software for temporary use or lease.
В тому випадку, якщо організація планує використовувати програмне забезпечення в режимі аутсорсингу, тобто не купляти його для себе, а орендувати у постачальників послуг, їй необхідно звертатися лише до постачальників, які мають спеціальну угоду з Microsoft — Service Provider License Agreement. Див. подробиці на сторінці «Оренда послуг у постачальників ПЗ». Інформацію про ліцензування для інтернет-кав’ярень і комп’ютерних клубів, а також інших організацій, що здають ПЗ в оренду, наведено на сторінці «Організаціям, що здають ПК в оренду».
Do you need help with software licensing in Uzhgorod, Mukachevo, HUST, Tiachev, Rahov and large bullock contact our specialists will help you. online form on the website. We will get back to you.
Microsoft has opened a pre-order on Windows 8
Microsoft has opened a pre-order October 12 on Windows 8 Pro, according to a blog company.
Peredzamovyty can both DVD to upgrade to Windows 8 Pro, and computers largest manufacturers (Acer, ASUS, Dell, HP, Samsung and Sony) pre-installed with the new OS.
Boxed version upgrade to Windows 8 Pro will cost $ 70;
Those who have purchased or will purchase computer to Windows 7 from 2 June 2012 to 31 January 2013, an upgrade over the internet cost only $ 15.
The full retail version of Windows 8 Pro will be released - will buy only OEM-version (usually this means the installed OS), and in this case, according to online retailer Newegg, it will cost $ 140.
All announced higher prices will apply until the end of January 2013, and then grow significantly.
Операційна система Windows 8 відрізняється від попередньої новим інтерфейсом Metro, а також тим, що вона оптимізована для використання на планшетних пристроях. Одна з версій нової ОС (Windows RT) призначена саме для таких пристроїв і буде працювати на процесорах з архітектурою ARM. Попередню ОС Microsoft Windows 7 можна було встановити тільки на комп’ютери з процесорами архітектури x86.
Simultaneously with the release of Windows 8 Microsoft will release its own tablet Surface on this OS.
Windows 8 can be ordered in us contact.
Errors when connecting
Pomilka 650, "The remote access server is not responding":
Pomilka 619 "configured incorrectly security VPN connection, VPN-traffic is blocked on the way to the gateway or VPN configuration does not take effect"
Trojan.WinLock.3333 universal instruction
Phones and account numbers are changing.
This banner is unlock codes.
You can search here
https://www.drweb.com/xperf/unlocker/
http://sms.kaspersky.ru/
If you can not locate the unlock code, then use a cunning way.
1) When you turn on the computer, press and hold down F8
(Here I slightly obmanyvayu.Delo that certain models of laptops entry in the BIOS also invoked with F8. Therefore push button immediately after enrollment, and 1-2 seconds later)
Until the Advanced Options menu.
2) Choose Directory Services Restore (only domain controller Windows).
3) Press Enter.
4) Again press Enter.
Then wait for boot
5) Push So.
Appears desktop.
6) Now press the Machine-Vikonati
7) A window "Run Program". Injected into the appeared window word msconfig
8) In the box Setting up PC Sistemi perehodimo a tab Startup.
Typically this vinlok prescribed by Desktop subscriber in paptsі Temp.
The file itself is hidden in nenastroennoy Explorer is not visible.
Name the file, as a rule consists of a set of numbers and start from scratch.
Наприклад 0.7097480452486065.exe або 0.8341312541728995.exe
In cases odelnyh file name is different, like 312.exe
9) Next, we simply znímaêmo galočku and press OK.
10) A box with a question about restarting .... Choose Restart.
The system should boot without vinloka.
————————————————– ——————————————
If all goes with a bang, an immensely proud 🙂 and try to help others.
And for this we try to find myself I've found vinloka (da-da. .. it is still in the system and not deleted ... is itself dead weight).
I. Push Start-panel upravlіnnya
II. Click on Switch to Classic View
III. Choose Vlastivostí Folder
IV. Click on the tab Appearance
V. dip slightly lower (c slider 1) and click on Show hidden files and folders (In Fig. During No. 2)
Post this I've found in anti laboratoriyi.https :/ / vms.drweb.com / sendvirus /
http://support.kaspersky.ru/virlab/helpdesk.html
Here is a short list of popular Trojan (September) response codes:
- Trojan.Winlock.6492 на номер 79060529771
- Trojan.MbrLock.6 на номер 9816869234
- Trojan.MbrLock.6 на номер 9263604604
- Trojan.WinLock.2741 на номер U114954542905
- Trojan.WinLock.3333 на номер 89171354432
- Trojan.MbrLock.6 на номер U380635741911
- Trojan.MbrLock.6 на номер U380984147972
- Trojan.MbrLock.6 на номер U380938799715
- Trojan.MbrLock.6 на номер U380689134220
- Trojan.MbrLock.6 на номер U380982072990
- Trojan.MbrLock.6 на номер U380684519844
- Trojan.MbrLock.6 на номер U380684493817
- Trojan.Winlock.6412 на номер 79874498413
- Trojan.WinLock.2741 на номер U256708181378
- Trojan.WinLock.2741 на номер U133389663907
- Trojan.MbrLock.6 на номер U380679066133
- Trojan.WinLock.2741 на номер U162700889785
- Trojan.MbrLock.6 на номер U380689384245
- Trojan.MbrLock.6 на номер U380679057579
- Trojan.MbrLock.6 на номер U380689386397
- Trojan.MbrLock.6 на номер U380979024068
- Trojan.MbrLock.6 на номер U380632713229
- Trojan.MbrLock.6 на номер U380631095243
- Trojan.MbrLock.6 на номер U380984131575
- Trojan.MbrLock.6 на номер U380981161071
- Trojan.MbrLock.6 на номер U380684495438
- Trojan.MbrLock.6 на номер U380679066133
- Trojan.MbrLock.6 на номер U380635741911
- Trojan.WinLock.2741 на номер U211063599019
- Trojan.MbrLock.6 на номер 9258794615
- Trojan.WinLock.2741 на номер U341971846679
- Trojan.WinLock.2741 на номер U118473344683
- Trojan.MbrLock.6 на номер U380981161476
- Trojan.MbrLock.6 на номер 9258730117
- Trojan.Winlock.6492 на номер 79067307638
- Trojan.Winlock.6412 на номер 79879496471
- Trojan.MbrLock.6 на номер U380684499952
- Trojan.MbrLock.6 на номер 380984132662
- Trojan.MbrLock.6 на номер 380984178073
- Trojan.MbrLock.6 на номер U380930672341
- Trojan.MbrLock.6 на номер U380984148741
- Trojan.WinLock.2741 на номер U301462561680
- Trojan.MbrLock.6 на номер 380981243255
- Trojan.WinLock.2741 на номер U334866313621
- Trojan.MbrLock.6 на номер U380934330268
- Trojan.MbrLock.6 на номер U380684494851
- Trojan.MbrLock.6 на номер U380684529291
- Trojan.Winlock.6651 на номер 77025639091
- Trojan.WinLock.2741 на номер U343743345954
- Trojan.Winlock.6176 на номер 79171504291
- Trojan.MbrLock.6 на номер 380919262894
- Trojan.WinLock.2741 на номер U450308783108
- Trojan.MbrLock.6 на номер U380986427099
- Trojan.MbrLock.6 на номер U380689383757
- Trojan.MbrLock.6 на номер U380931455271
- Trojan.WinLock.2741 на номер U376801214066
- Trojan.WinLock.2741 на номер U268887020116
- Trojan.MbrLock.6 на номер U380981256738
- Trojan.MbrLock.6 на номер U380930756405
- Trojan.MbrLock.6 на номер 89178638392
- Trojan.Winlock.6492 на номер 79091677662
- Trojan.MbrLock.6 на номер U380934330286
- Trojan.MbrLock.6 на номер U380684497327
- Trojan.MbrLock.6 на номер U380986398261
- Trojan.MbrLock.6 на номер U380986427243
- Trojan.MbrLock.6 на номер U380689383991
- Trojan.MbrLock.6 на номер U380684497625
- Trojan.MbrLock.6 на номер U380984178177
- Trojan.MbrLock.6 на номер U380969113609
- Trojan.MbrLock.6 на номер U380984131536
- Trojan.MbrLock.6 на номер U380684496763
- Trojan.MbrLock.6 на номер 89179259609
- Trojan.WinLock.2741 на номер U311501858307
- Trojan.WinLock.5554 на номер 79171531152
- Trojan.MbrLock.6 на номер 89099645129
- Trojan.WinLock.6746 на номер R126061817850
- Dr.Web LiveCD 6.0.2 beta redaktiruem registry
- Trojan.Winlock.6492 на номер 79670416903
- Trojan.Winlock.6312 на номер 9881847991
- Trojan.WinLock.2741 на номер U425045142106
- Trojan.MbrLock.6 на номер U380679066047
- Trojan.MbrLock.6 на номер 89653788568
- Trojan.MbrLock.6 на номер 380969126037
- Trojan.MbrLock.6 на номер 380930756274
- Trojan.MbrLock.6 на номер 380984178174
- Trojan.MbrLock.6 на номер 380984131760
- Trojan.MbrLock.6 на номер 380938345281
- Trojan.MbrLock.6 на номер 380684493459
- Trojan.Generic.7648728 на номер R422325390324
- Trojan.WinLock.2741 на номер U158400053920
- Trojan.MbrLock.6 на номер 380684497468
- Trojan.WinLock.2741 на номер 89614241462
- Trojan.WinLock.2741 на номер U346902283114
- Trojan.MbrLock.6 на номер 89036142309
- Trojan.MbrLock.6 на номер 380679066088
- Trojan.MbrLock.6 на номер 380679057846
- Trojan.MbrLock.6 на номер 380679057846
- Trojan.MbrLock.6 на номер 380975716299
- Trojan.MbrLock.6 на номер 380971829136
- Trojan.MbrLock.6 на номер 380930253296
- Trojan.MbrLock.6 на номер 380679073080
- Trojan.MbrLock.6 на номер 380679057786
- Trojan.MbrLock.6 на номер U380938337706
- Trojan.WinLock.2741 на номер U232683271942
- Trojan.Winlock.6412 на номер 79879154382
- Trojan.MbrLock.6 на номер 380963914694
- Trojan.MbrLock.6 на номер 380984131653
- Trojan.MbrLock.6 на номер 380930756397
- Trojan.MbrLock.6 на номер 380679065947
- Trojan.MbrLock.6 на номер 380930756331
- Trojan.MbrLock.6 на номер 380684493474
- Trojan.MbrLock.6 на номер 380969126461
- Trojan.MbrLock.6 на номер 380984132662
- Trojan.MbrLock.6 на номер 380984178073
- Trojan.MbrLock.6 на номер 380986427346
- Trojan.MbrLock.6 на номер 380679066181
- Trojan.WinLock.2741 на номер U363425519584
- Trojan.Winlock.6312 на номер 9881847966
- Trojan.Winlock.6412 на номер 79198021022
- Trojan.MbrLock.6 на номер 380969126325
- Trojan.MbrLock.6 на номер 380980554105
- Trojan.MbrLock.6 на номер 380679066133
- Trojan.WinLock.2741 на номер U760987506308
- Trojan.MbrLock.6 на номер 380984131653
- Trojan.WinLock.2741 на номер U381390042198
- Trojan.Winlock.6176 на номер 79139049389
- Trojan.Winlock.6312 на номер 9881858304
- Corrector businessman in sorrow 😉
- Trojan.MbrLock.6 на номер U380969113639
- Trojan.MbrLock.6 на номер U380684493662
- Trojan.MbrLock.6 на номер U380934330266
- Trojan.MbrLock.6 на номер U380632713287
- Trojan.MbrLock.6 на номер U380635810723
- Trojan.MbrLock.6 на номер U380684492779
- Trojan.WinLock.2741 на номер U243045499148
- Trojan.Winlock.6651 на номер 77058770114
- Trojan.MbrLock.6 на номер 89687152215
- Trojan.MbrLock.6 на номер U380938337706
- Trojan.MbrLock.6 на номер 380971292281
- Trojan.WinLock.2741 на номер U160695189217
- Trojan.WinLock.3333 на номер 89879395524
- Trojan.Winlock.6492 на номер 79060546657
- Trojan.Winlock.6312 на номер 9881854404
- Trojan.WinLock.2741 на номер U214544348197
- Trojan.Winlock.6312 на номер 7757235054
- Trojan.MbrLock.6 на номер 89037084353
- Trojan.MbrLock.6 на номер 89057074889
- Trojan.Winlock.6658 c текстом Department of justic…
- Trojan.MbrLock.6 на номер 380689360419
- Trojan.MbrLock.6 на номер U380938097066
- Trojan.WinLock.2741 на номер U130802468318
- Trojan.MbrLock.6 на номер U380939827909
- Trojan.MbrLock.6 на номер U380938372495
- Trojan.Winlock.6426 на номер 79879250514
- Trojan.Winlock.6651 на номер 380637310339
- Trojan.WinLock.2741 на номер U244464075419
- Bud Пиво
- Trojan.WinLock.6510 на номер 380665300919
Configuring PPPoE-connection for Windows 7
Operating System Windows 7 has native support for protocol PPPoE, therefore connection settings for any additional software install is required.
To set up a connection via broadband protocol PPPoE (Point-to-point protocol over ethernet), you must do the following:
1. Click "Start" - & gt; "Control Panel" ("Start" - & gt; "Control Panel", "Start" - & gt; "Control panel"):

2. In the "Control Panel" ("Control Panel", "Control panel") section "Mreža j Internet" ("Network and Internet", "Network and Internet") oberіt item "View network status and tasks" ("Browsing Network Status and Problems", "View network status and tasks"):

3. In the "Network and Sharing Center" ("Control Center Network and Sharing", "Network and Sharing Center") oberіt item "Set up a new connection or network" ("Setup new Network Connection ili", "Set up a new connection or network"):

4. The dialog "Choose a connection option" ("Select Variant Connection", "Choose a connection option") oberіt item "Connect to the Internet" ("Internet Connection", "Connect to the Internet") and then "Next" ("Next", "Next"):

* If at the time of connection on your computer, there are other PPPoE Internet connection (eg "Internet 2"), you will see a dialog "Use an existing connection?" ("Require ymeyuscheesya Connection?", "Do you want to use a connection that you already have?"). To continue setup, select "± Hi, stvoriti basis of broadband Internet" ("No, create a new connection", "No, create a new connection“) and then"Next" ("Next", "Next"):

5. Dialog "Yakima rank Decembe?" ("How to connect?", "How do you want to connect?") oberіt item "Širokosmugove (PPPoE)" ("High Speed (with PPPoE)", "Broadband (PPPoE)"):

6. Dialog "Enter the information received from your Internet service provider" ("Enter the info, poluchennuyu from a supplier of services Intenet", "Type the information from your Internet service provider (ISP)") in fields "Your username" ("User is Name", "User name") and "Password" ("Password", "Password") enter the login and password provided to you when you make statements ordering. In the Field "Connection Name" ("Connection Name", "Connection Name") enter an arbitrary name for the new connection (for example, "Internet"), and then "Connect" ("Connect", "Connect"):
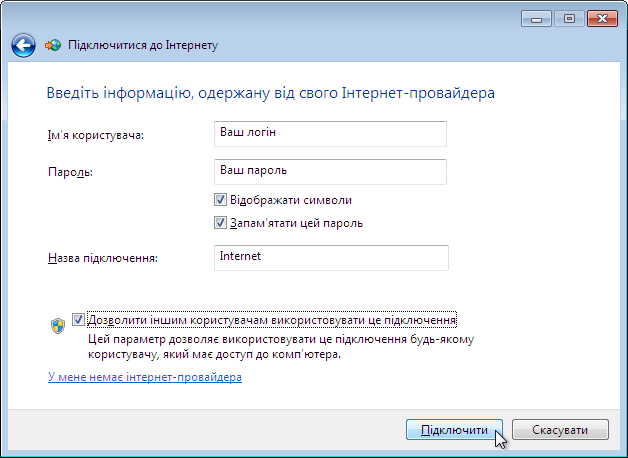
7. If everything was done correctly, your internet connection is successful and you get the info window "The computer is connected to the Internet" ("Connect to Internet Complete Flag", "You are connected to the Internet")Where you can click "Move to the Web page" ("fits Browse Intenet k", "Browse the Internet now")Then open a window in your default browser, or click "Close" ("Close", "Close")If the previous option does not suit you:

8. When first using this connection further window appears "Select a location for the network" Internet "(" Choose a Location of sets for "Internet", "Select a location for the 'Internet' network") application requesting network settings to connect. Choose the type that best suits you (eg "Home Network" ("Home", "Home")):

9. Manage Connections on your computer by using the menu "Now you are connected to" ("Tekuschye Connection", "Currently connected to")Get into what you can click with the left mouse button on the monitor icon in the system tray near the clock. If your Internet connection is currently established icon“Internet” appear in this menu status "Connected" ("Connected", "Connected"):

10. The next time you need to re-connect to the Internet, go to the menu "Now you are connected to" ("Tekuschye Connection", "Currently connected to") and then "Connect" ("Connection", "Connect“) opposite the connection with the title “Internet”:

11. Will appear Then "Підключення до Internet" ("Подключение к Internet," "Internet Connect")In which to connect to the Internet (provided correctly entered your login and password), just click "Connect" ("Connect", "Connect").

Configuring PPPoE-connection for Windows XP
Windows XP has built-in support PPPoE protocol is to configure the connection to install additional software is required.
To configure broadband connection using the protocol PPPoE (Point-to-point protocol over Ethernet) you must do the following:
1. Click "Start" - & gt; "Control Panel" ("Start" - & gt; "Control Panel", "Start" - & gt; "Control panel"):

2. In the "Control Panel" ("Control Panel", "Control panel") Click the icon "Merezhnі pіdklyuchennya" ("Network Connections", "Network Connections"):

3 In the main window menu "Merezhnі pіdklyuchennya" ("Network Connections", "Network Connections") відкрийте "File" - & gt; "New Connection" ("File" - & gt; "Novoe Connection", "File" - & gt; "New Connection"):

4. The dialog "New Connection Wizard" ("Master íîâûõ Connected", "New Connection Wizard") click "Next" ("Next", "Next"):

5. Dialog "Type merezhnogo pіdklyuchennya" ("Network Connection Type", "Network Connection Type") oberіt item "Connect to the Internet" ("HP Internet Connect", "Connect to the Internet") and then "Next" ("Next", "Next"):

6. Dialog "Preparations" ("Ydet Preparation", "Getting Ready") oberіt item "Ustanoviti pіdklyuchennya manually" ("Set up my connection manually", "Set up my connection manually") and then "Next" ("Next", "Next"):

7 In the dialog box "Connecting to the Internet" ("Internet Connection", "Internet Connection") click "Through a broadband connection that requires a user name and enter the password" ("Through vыsokoskorostnoe Connections Name zaprashyvayuschee Users and Password", "Connect using a broadband connection that requires a user name and password") and then "Next" ("Next", "Next"):

8 In the dialog box "User name" ("Connection Name", "Sonnection Name") in field "The name of your Internet Service Provider" ("Name a supplier of services", "ISP Name") Enter an arbitrary name for the new connection (for example, “Internet”Used) and press "Next" ("Next", "Next"):

9 In the dialog box "Account Information Internet" ("Details uchetnoy records on the Internet", "Internet Account Information") in fields "User" ("User is Name", "User name") and "Password" (password "," Password ") enter the login and password provided to you when you make statements ordering. In the Field "Confirmation" ("Confirmation", "Confirm password") re-enter your password and press "Next" ("Next", "Next"):

10 Then will last settings window where you can choose to create a connection icon on the desktop. "Add shortcut Desktop Connection" ("Add Connection yarlыk on a desktop", "Add a shortcut to this connection to my desktop") and then "Done" ("Done", "Finish"):

11 Then will appear as soon as you set up an Internet connection in which to connect to the Internet, just click "Connect" ("Connect", "Connect"):

12 If everything was done correctly, the connection is successful and the tray (system tray near the clock) icon appears and the connection type pop-up message “Internet зараз підключено” (“Internet сейчас подключен”, “Internet is now connected”).
Can not connect to my home network?
The information and troubleshooting steps for connecting a home network in Windows 7.
Symptom:
![]() Status icon wireless network connection shows no connection
Status icon wireless network connection shows no connection
On the network map does not appear connected to networks or Internet

If your computer was previously connected to a home network, but it is not connected to it, follow these steps to try to fix the problem.
Notes. The following steps assume that the network has been configured before.
Check the connection after each step.
Step 1: When a wireless connection, make sure that your computer is connected to the desired network
If the computer was last connected to the network, it will attempt to reconnect when it detects the wireless network.
Click Network connection ![]() in the notification area to verify connections or wireless networks.
in the notification area to verify connections or wireless networks.
If your computer is not connected to the network, click on the line with the name of the network, and then click Disable. Click the row with the name of the required network, click Connect.
If your computer is connected to the correct network, make sure the security settings meet the necessary requirements and have a password to access the network. Center Network and Sharing Center.
Step 2: Check the connection cable of the device and reset the modem or router
Follow these steps to test the connection cables, reset the hardware and connect the computer directly to the modem.
- Turn off the computer.
- Disconnect all cables except the power cord, keyboard, mouse and monitor.
- Turn off the power on your router, cable / DSL-modem or a combination router / modem and wait for the lights will go out works.
- Disconnect all cables from the modem and router.
- Check for bent or damaged pins on the ends of the cables and connectors inside a computer, router or modem.
- Connect all cables except the power cord to the modem and the router.
- Підключіть комп’ютер до роз’єму на тильній стороні корпусу кабельного / DSL-модему або маршрутизатора за допомогою мережного кабелю (RJ45). Не проводьте кабелі поруч з динаміками і не перегинайте надлишки кабелю. По можливості використовуйте кабелі довжиною не більше 1,83 м. Переконайтеся, що для підключення маршрутизатора до комп’ютера використовується кабель відповідного типу (див. наступний малюнок).
Notes. If you're using a wireless connection, its configuration can be done later, after it is determined that your computer connects to the Internet is possible by direct network cable connection.
Cables to connect the DSL-or cable modem to the computer
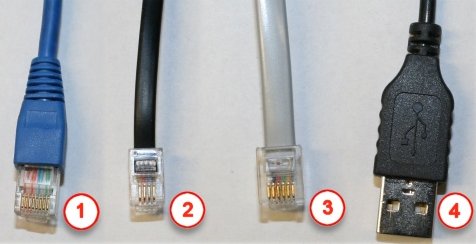
1 - Network cable RJ45 - Cat5/Cat6.
2 - Telephone cable RJ11. Do not use this cable to connect to your computer.
3 - Special telephone cable with 6 conductors. Do not use this type of cable.
4 - Cable USB.
- Connect the power cord to the modem and router and switch them.
- Почекайте, поки індикатори пристрою не стануть блимати як зазвичай або перестануть мигати. Для цього повинно знадобитися приблизно від 10 до 30 секунд. Якщо індикатор блимає дивним чином, або кілька індикаторів не горять, це є ознакою неполадки в наданні послуги Інтернет. Див опис комбінацій миготливих індикаторів в керівництві до широкосмугового пристрою й зверніться до свого провайдера у випадку виникнення неполадок.
- Once the lights on the device broadband flashes normally or will burn continuously, turn on the computer.
- Wait until Windows fully loaded, and then connect to the Internet.
Step 3: Run the "Network Diagnostics Windows"
Windows 7 контролює підключення до мережі та Інтернет. При виявленні неполадки відобразиться повідомлення про відсутність з’єднання або обмеженому підключенні і буде запитано дозвіл користувача на виконання діагностики неполадки. Натисніть OK, щоб дозволити Windows 7 виконати діагностику і відновити з’єднання.
To manually run diagnostics, do the following:
Option 1
Right-click the network connection ![]() in the notification area on the taskbar and select Troubleshooting. Windows Network Diagnostics tool will check the system for troubleshooting.
in the notification area on the taskbar and select Troubleshooting. Windows Network Diagnostics tool will check the system for troubleshooting.
Troubleshooting

Option 2
Click Start ( ![]() ) And type network and sharing in the Search programs and files. In the results, click the icon Center Network and Sharing Center.
) And type network and sharing in the Search programs and files. In the results, click the icon Center Network and Sharing Center.
Launch of the "Center Network and Sharing Center" from the Start menu

Option 3
The Center Network and Sharing Center, click the symbol to a yellow exclamation point ![]() cross or red
cross or red ![]() in the "Network Status" to start the "Network Diagnostics Windows".
in the "Network Status" to start the "Network Diagnostics Windows".
Network Status

Step 4: Use the troubleshooter network and Internet
У Центрі управління мережами і загальним доступом в Windows 7 є засіб усунення неполадок мережі та інтернету, яке виконує перевірку на наявність несправностей в мережі і, якщо необхідно, виконує автоматичну корекцію програмних підключень. Використовуйте цей інструмент для перевірки та виправлення помилок підключення наступним чином:
- The Center Network and Sharing Center, click Troubleshooting.
Troubleshooting

Opens the "Tool to troubleshoot network and the Internet."
Troubleshooter Network and Internet

- Click Connecting to the Internet, to check the Internet connection.
- To check your system for malfunctions, follow the instructions on the screen.
- If the problem is resolved, no further action is required.
If the problem persists, go to "Troubleshooter Network and Internet" and then click Network adapter to test the adapter.
Step 5: In the "Device Manager" Check if the network adapters
- Click Start (
 ) And type Device Manager in the Search programs and files. In the search results, locate and click Device Manager.
Open the dialog "Device Manager" from the "Start" menu

- Double-click Network adapters.
Device Manager - Network Adapters

- Check the hardware LAN.
- If the icon next to the network card is an arrow (
 ), Which means that the device is disabled. Right-click the line with the name of the network device and then click Enable.
Enabling hardware LAN

Notes. If the board LAN is not listed, click the menu Action item Scan for hardware changes. If the network adapter is still not listed, restart the computer, then return in the "Device Manager."
- Після включення апаратного забезпечення локальної мережі перевірте підключення до мережі. Якщо підключення все ще не вдається встановити, спробуйте скористатися наступними корисними порадами, а також зробити кроки для усунення симптому Низька швидкість з’єднання або розриви підключення .
Other actions:
- Reinstall the original software and drivers network adapters computer.
- Check your firewall settings to make sure that the browser is open access to the network.
- Connect to the other computer to see if the problem relates to only one PC.
- Check the websites of suppliers computer, network card, modem and / or router for updates firmware and drivers.
- Contact your local ISP or modem manufacturer to consult on additional measures troubleshooting.
- Reset the router to factory defaults.
Can not connect to the Internet?
Here we will post instructions for diagnosing and troubleshooting connectivity to the Internet via your home network in Windows 7.
Symptoms of faults:
![]() Status icon to connect to a wireless network - connected to the network, no Internet access
Status icon to connect to a wireless network - connected to the network, no Internet access
Network Map does not show if you have access to the Internet:
![]()
When you try browsing displays error messages
the In the Internet Explorer can not be watching any of the web page.
the Offline: Internet connection is not available.
the No Connection: You are not connected to any network.
If your computer can connect to the network, but not to the Internet, follow these steps.
Notes. These steps assume that the network was set up earlier and have a contract with your ISP.
Step 1: When a wireless connection, make sure that your computer is connected to the desired network
If the computer was last connected to the network, it will attempt to reconnect when it detects the wireless network.
To determine which network connection is established, and select your network, follow these steps:
Click the Network connection ![]() in the notification area to verify connections or wireless networks.
in the notification area to verify connections or wireless networks.
If your computer is not connected to the network, click on the line with the name of the network, and then click Disable. Click the row with the name of the required network, click Connect.
When you connect the computer to the desired network check for Internet access.
Step 2: Try running Internet Explorer without add-
Determine whether the source of faults external applications or embedded modules.
- Click Start (
 ) And type add in the "Search programs and files", then click the line Internet Explorer (no built-ins).
Go to "Start" in reference to Internet Explorer (no built-ins)
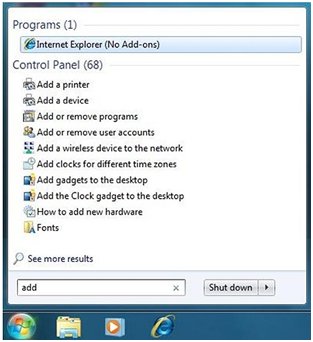
- In the Internet Explorer page is displayed with the text "All add-ins are disabled Internet Explorer."
- Enter www.i-help.us into your browser and press Enter.
- Select one of the following depending on what is displayed in the Internet Explorer:
Option 1
Якщо у вікні Internet Explorer відобразиться небудь веб-сторінка, комп’ютер підключений до Інтернет, і джерелом неполадок є один або кілька вбудованих модулів. Для усунення цієї неполадки, можливо, буде потрібно знайти і видалити шпигунське ПЗ (spyware), і видалити всі недавно встановлені рекламні програми (adware) і доповнення браузера.
Option 2
If Internet Explorer does not display web pages, or the computer attempts to dial to connect, continue to perform the next steps.
Step 3: Reset Internet
To prepare Windows to troubleshooting and solving most of the problems associated with navigation on the Internet, please reset the Internet as follows:
- Закрийте всі вікна Internet Explorer.
- Click Start (
 ) Select Control Panel then Network and Internet.
Network and Internet
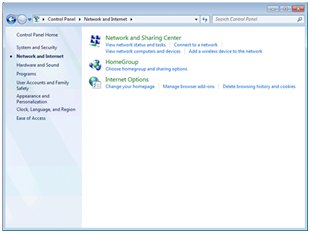
- Select Options.
Opens "Internet Options."
- Click the Additionally and click Reset.
The "Reset" on the "Advanced" tab in the "Options"
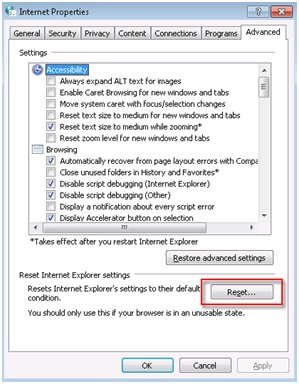
A window "Reset Internet Explorer".
- Read the information on the screen, check the box Vidaliti osobistі settings and then Reset.
Скидання установок Internet Explorer
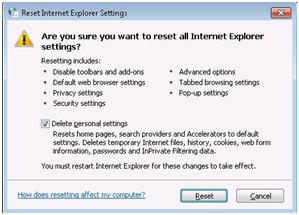
- After resetting, perform Windows Internet Explorer, click Closed.
- Try to connect to the Internet and go to the website www.i-help.us.
Step 4: Check the connection cable of the device and reset the modem or router
Follow these steps to test the connection cables, reset the hardware and connect the computer directly to the modem.
- Turn off the computer.
- Disconnect all cables except the power cord, keyboard, mouse and monitor.
- Turn off the power on your router, cable / DSL-modem or a combination router / modem and wait for the lights will go out works.
- Disconnect all cables from the modem and router.
- Check for bent or damaged pins on connectors and cable computer, router or cable modem.
- Connect all cables except the power cord to the modem and the router.
- Підключіть комп’ютер до роз’єму на тильній стороні корпусу кабельного / DSL-модему або маршрутизатора за допомогою мережного кабелю (RJ-45). Не проводьте кабелі поруч з динаміками і не перегинайте надлишки кабелю. Якщо можливо, використовуйте кабелі довжиною 1,83 метрів або менше. Переконайтеся, що для підключення маршрутизатора до комп’ютера використовується кабель відповідного типу (див. наступний малюнок).
Notes. If you're using a wireless connection, its configuration can be done later, after it is determined that your computer connects to the Internet is possible with a direct network cable connection.
Cables to connect the DSL-or cable modem to the computer

1 - Network cable RJ45 - Cat5/Cat6.
2 - Telephone cable RJ11. Do not use this cable to connect to your computer.
3 - Special telephone cable with 6 conductors. Do not use this type of cable.
4 - Cable USB.
- Connect the power cord to the modem and router and switch them.
- Почекайте, поки індикатори пристрою не стануть блимати як зазвичай або перестануть мигати. Для цього повинно знадобитися приблизно від 10 до 30 секунд. Якщо індикатор блимає дивним чином, або кілька індикаторів не горять, це є ознакою неполадки в наданні послуги Інтернет. Див опис комбінацій миготливих індикаторів в керівництві до широкосмугового пристрою й зверніться до свого провайдера у випадку виникнення неполадок.
- Once the lights on the device broadband flashes normally or will burn continuously, turn on the computer.
- Почекайте, поки Windows повністю завантажиться, після чого підключіться до Інтернету. Перейдіть на веб-вузол www.i-help.us . Якщо неполадки з підключенням не вдається усунути, спробуйте скористатися наступними корисними порадами, після чого перейдіть в розділ Не вдається підключитися до домашньої мережі .
Other actions:
- Check your firewall settings to make sure that the browser is open access to the network.
- Connect to the other computer to see if the problem relates to only one PC.
- Contact your local ISP or modem manufacturer to consult on additional measures Troubleshooting.
- Reset the router to factory defaults.
Also we can offer you the service: Setting up WiFi-routers gudit_computer
Guide to buying a laptop computer
Here are five key factors that should be paid attention to when purchasing a laptop computer.
Portable PC
Portativnіst
If you wear every day with a laptop or tablet weight is important.
Memory
For maximum portability, choose the minimum amount of memory.
Connect
Найзручніше підключення забезпечують бездротові мережі Wi‑Fi і Bluetooth. Варто також подбати про роз’єми, які полегшують роботу в дорозі. За допомогою USB-роз’ємів можна підключати чи відключати зовнішні жорсткі диски, музичні програвачі, мобільні телефони та інші пристрої, які вам не знадобляться в дорозі.
Battery charge
Для забезпечення портативності потрібна тривала робота акумулятора. Не надто захоплюйтеся іграми, переглядом телебачення та підключенням до безпроводових мереж – вони споживають багато заряду. Інший спосіб забезпечити тривалу портативність – вибирати комп’ютери з невеликим екраном (12 дюймів або менше), який має меншу роздільну здатність. Можна також придбати додатковий акумулятор, але це додасть зайвої ваги.
Memory
Що більше оперативної пам’яті у вашому комп’ютері, то більше програм можна запустити одночасно. Для портативного комп’ютера, який використовується здебільшого для надсилання електронних листів, пошуку в Інтернеті, роботи у програмах Microsoft Office і для інших повсякденних справ, потрібно не більше 2 ГБ оперативної пам’яті.
If you need to buy a computer in Uzhgorod, Mukachevo and Rahov contact:
komp@i-help.us
Tel. 38 (097) 966-1803


