ремонт

Як почистити клавіатуру, не розбираючи її
Як почистити клавіатуру, не розбираючи її? Сучасний світ без комп’ютера практично не обходиться. А будь-який комп’ютер не мислимий без клавіатури. Клавіатура – це прямий і зручний спосіб введення будь-якої інформації.
Ті, хто юзает клавіатуру по повній програмі, відмінно знають, як вона забруднюється. То пил накопичитися, то крихти від бутерброда, то дрібний бруд від заточування олівців або використання гумки, то ще щось. Необхідний догляд та регулярне чищення клавіатури. Отже, як почистити клавіатуру. (more…)
Програма AMMYY ADMIN. Як встановити віддалене підключення до робочого столу
Ammyy Admin – безкоштовна програма, яка допоможе Вам підключитися до віддаленого комп’ютера і керувати ним без особливих зусиль. Все що для цього потрібно – наявність підключення до Інтернету.
Приступимо!
Відкриваємо браузер (програму доступу до Інтернет – Google Chrome, Mozilla Firefox і т.п.) і переходимо на сайт розробника в розділ завантажень . Запускаємо завантаження Ammyy Admin вибравши необхідну нам версію програми. (more…)
Програма TEAMVIEWER. Як встановити віддалене підключення до робочого столу
TeamViewer – програма, яка допоможе Вам підключитися до віддаленого комп’ютера і керувати ним без особливих зусиль. Все, що для цього потрібно – наявність підключення до Інтернету. Програма TeamViewer безкоштовна для некомерційного використання.
Встановимо програму!
Відкриваємо браузер (програму доступу до Інтернет – Google Chrome, Mozilla Firefox і т.п.) і переходимо на сайт розробника програми в розділ завантажень . Залежно від встановленої на Вашому комп’ютері операційної системи вибираємо інсталяційний файл і викачуємо його. Розглянемо докладніше установку програми в середовищі Windows. (more…)
Avast з базами від 5 грудня глючить? Перестав працювати інтернет.
З’ясувалося, що проблема масова, avast з базами від 5 грудня глюкнув (тільки на Win XP).
Помилкове спрацьовування avast на деяких російських операційних системах Microsoft Windows XP. “Аваст заблокував інтернет” – вирішення проблеми.
5 грудня 2012 виявлено помилкове спрацьовування безкоштовного avast! Free, що приводить до блокування інтернету у користувачів з російської операційною системою Windows XP і встановленими домашніми версіями антивіруса avast.
Самі Розробники попросили вибачення:
Від особи розробників приносимо свої вибачення, в поточних базах поновлення avast! вже прибрали помилкове спрацьовування на системний файл TCPIP.sys.
Просимо Вас врахувати той факт, що якщо у Вас avast працював 6-го грудня після 14.00, і отримував оновлення, і у Вас був інтернет, то у Вас пропав інтернет не з вини антивіруса Аваст, – звертайтеся до свого провайдера, так як помилкове спрацьовування було усунуто ввечері 5-го грудня (6 грудня рано вранці за московським часом).
Вам потрібна допомога у вирішенні даної проблеми в Ужгороді, Мукачево, Хусті, Тячеві, Рахові та Великому Бичкові? Телефонуйте +380979661803 наш спеціаліст надасть вам консультацію.
BSOD або синій екран смерті
Операційна система Windows з дня свого народження ніяк не могла похвалитися своєю стабільною роботою, ніж на довгі роки надихнула творчий потенціал своїх критиків. Тим не менш, користуватися чимось потрібно, тому доводиться миритися з тим що є, періодично отримуючи в нагороду помилки, зависання і інші аномальні явища системи.
Щоб якось вміти розбиратися в критичні помилки самим, розробники реалізували, починаючи з версії 1.0, спеціальне «вікно останнього подиху», або, як його офіційно називають, «синій екран смерті» blue screen of death (BSOD). У пізніх версіях ОС шляхом налаштування реєстру синій колір вікна можна поміняти на інший, але звучить це так, як ніби людині перед повішенням пропонують вибрати фасон мотузки.
Екран BSOD пов’язаний з помилками ядра системи, що відбувається в чистому вигляді досить рідко. Набагато частіше до помилки призводять нестабільно працюючі драйвери, що працюють в режимі ядра. У часи Windows 9x драйвери намагалися влізти в «кільце 0» захисту системи, щоб працювати ефективніше, але ця ефективність була під питанням через недостатню компетентність програмістів.
Хоча BSOD чесно намагається повідомити важливі відомості про причину своєї появи, видаючи номер стоп-коду, винного драйвера і набору адрес і регістрів, не має сенсу переписувати весь екран на папірець і диктувати її по телефону службі технічної підтримки чи знайомому програмісту – за цими даними виявити реальну проблему вкрай важко. Фактично, екран лише «пригальмовує» Windows від перезавантаження, щоб встигнути заповнити журнали помилок, вивантажити дамп пам’яті і, можливо, викликати один з багатьох «докторів», які дати більш повну інформацію. Якщо і в даному випадку аналізувати ситуацію нікому, то є можливість повністю відключити поява BSOD – система буде просто перезавантажуватися.

Найбільш часто синій екран смерті з’являється при помилках драйвера відеоплати, при роботі з підключуванням на льоту зовнішніми пристроями, при збоях оперативної пам’яті, при перенесенні жорсткого диска з системою на іншу платформу. У Windows 9x такий екран міг з’явитися при спробі запису на зіпсовану дискету, тому поява екрану можна було ігнорувати (але не завжди).
У будь-якому випадку, для простого користувача BSOD досі є грізною ознакою того, що пора б уже нарешті зберегти дані і готуватися до перевстановлення системи. Якщо ж Ви самостійно не в силах вирішити виниклу проблему синього екрану, звертайтеся до нас за комп’ютерною допомогою . Ми завжди вирішимо цю проблему!
У наступних статтях ми докладно зупинимося на деяких “основних” помилках які викликають цей синій екран.
Trojan.WinLock.3333 універсальна інструкція

Телефони та номери рахунків змінюються.
У цього банера є коди розблокування.
Їх можна пошукати тут
https://www.drweb.com/xperf/unlocker/
http://sms.kaspersky.ru/
Якщо Вам не вдалося знайти код розблокування, то скористаємося одним хитрим способом.
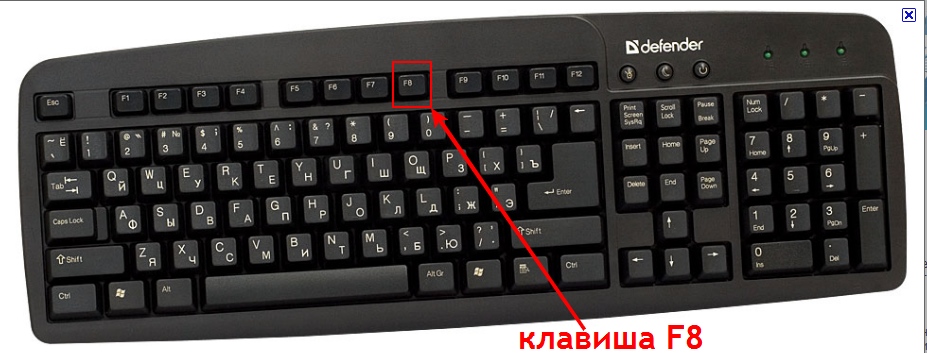
1) При включенні комп’ютера натиснути і тримати клавішу F8
(Тут я злегка обманиваю.Дело в тому, що в деяких моделях ноутбуків вхід в біос теж викликається за допомогою F8. Тож натискаємо клавішу не відразу ж після включенні, а на 1-2 сек пізніше)
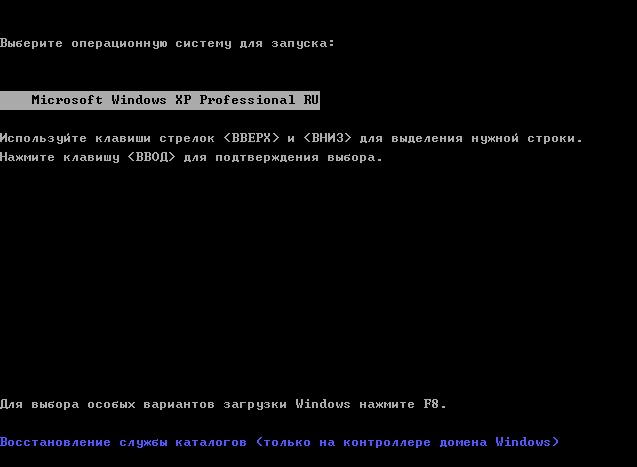
Доки не з’явиться меню додаткових варіантів завантаження.
2) Вибираємо Відновлення служби каталогів (тільки на контролері домену Windows).
3) Натискаємо Ентер.
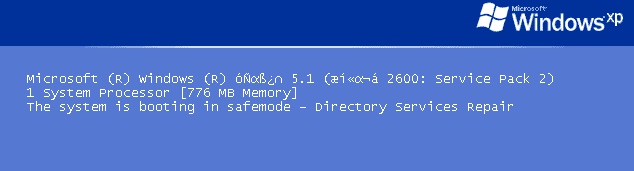
4) Ще раз натискаємо Ентер.
Після цього чекаємо завантаження системи
5) Натискаємо Так.
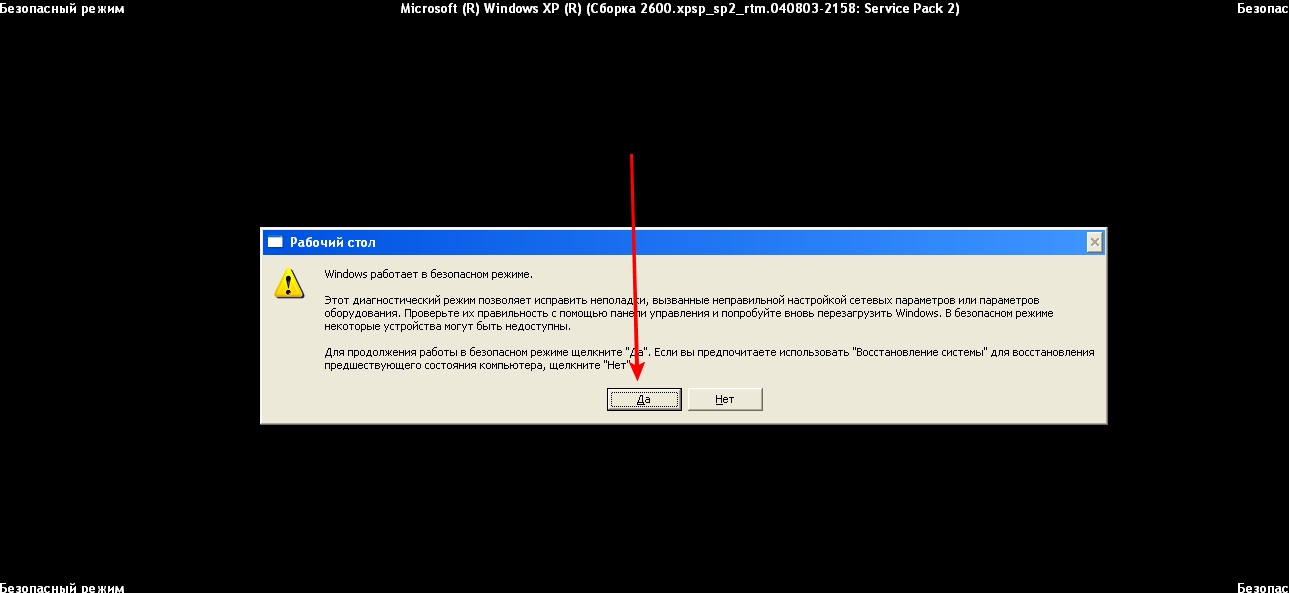
З’являється робочий стіл.
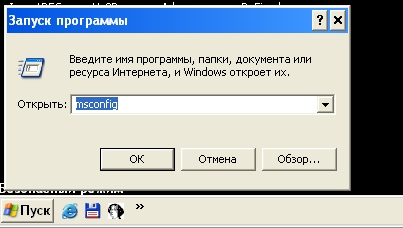
6) Тепер натискаємо Пуск-Виконати
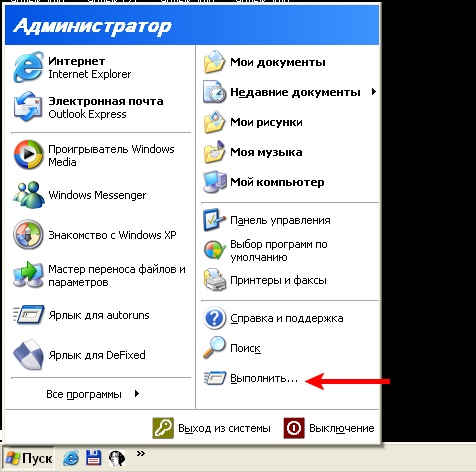
7) З’явиться віконце “Запуск програми”. Вводимо в що з’явилося віконце слово msconfig
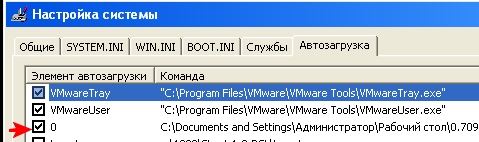
8) У віконці Налаштування системи переходимо у вкладку Автозавантаження.

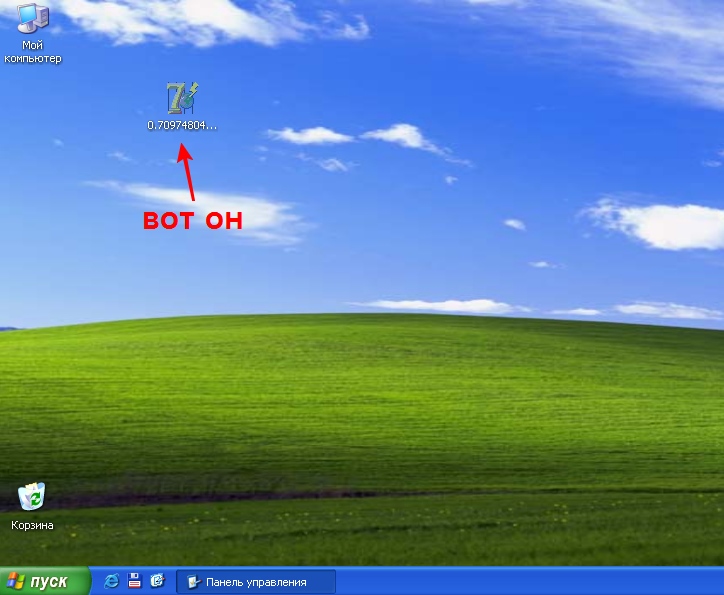
Як правило цей вінлок прописується на Робочому столі або в папці Temp.
Сам файл робиться прихованим і в ненастроенной Провіднику не видно.
Ім’я файлу, як правило складається з набору цифр і починається з нуля.
Наприклад 0.7097480452486065.exe або 0.8341312541728995.exe
У одельних випадках ім’я файлу буває іншим, наприклад 312.exe
9) Далі ми просто знімаємо галочку і натискаємо ОК.
10) З’явиться віконце з питанням про перезавантаження …. вибираємо Перезавантаження.
Система повинна завантажитися без вінлока.
————————————————– ——————————————
Якщо все пройшло на УРА, безмірно пишаємося собою 🙂 і намагаємося допомогти іншим.
А для цього ми спробуємо знайти сам файлик вінлока (да-да. .. він все ще в системі і не видалений … лежить собі мертвим вантажем).
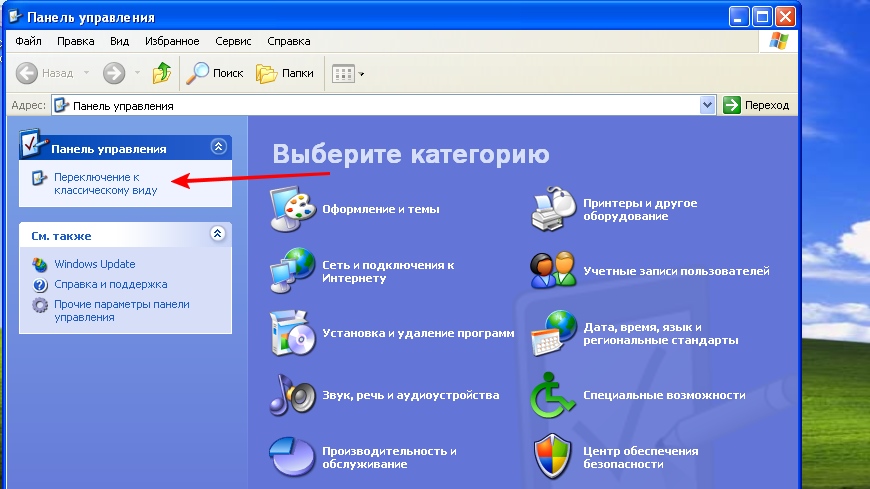
I. Натискаємо Пуск-Панель управління

II. Натискаємо на Переключення до класичного вигляду
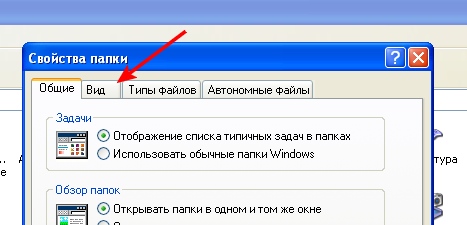
III. Вибираємо Властивості папки

IV. Клацаємо по вкладці Вигляд
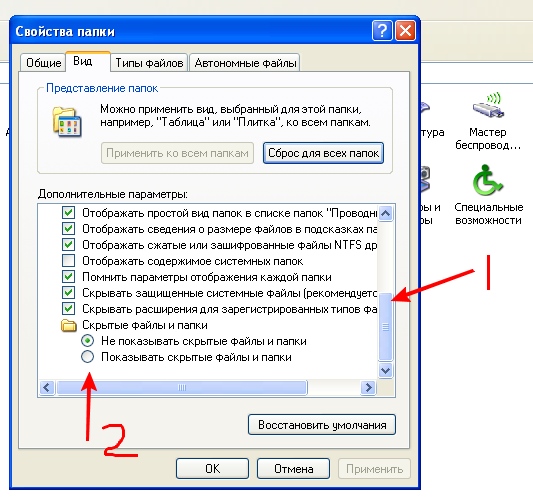
V. Опускаємося трохи нижче (c допомогою повзунка 1) і клацаємо по Показувати приховані файли і папки (на рис. Під номером 2)
Відправляємо цей файлик в антивірусні лабораторії.https://vms.drweb.com/sendvirus/
http://support.kaspersky.ru/virlab/helpdesk.html
Ось короткий список популярних Троянів (Вересень) з кодами відповіді:
- Trojan.Winlock.6492 на номер 79060529771
- Trojan.MbrLock.6 на номер 9816869234
- Trojan.MbrLock.6 на номер 9263604604
- Trojan.WinLock.2741 на номер U114954542905
- Trojan.WinLock.3333 на номер 89171354432
- Trojan.MbrLock.6 на номер U380635741911
- Trojan.MbrLock.6 на номер U380984147972
- Trojan.MbrLock.6 на номер U380938799715
- Trojan.MbrLock.6 на номер U380689134220
- Trojan.MbrLock.6 на номер U380982072990
- Trojan.MbrLock.6 на номер U380684519844
- Trojan.MbrLock.6 на номер U380684493817
- Trojan.Winlock.6412 на номер 79874498413
- Trojan.WinLock.2741 на номер U256708181378
- Trojan.WinLock.2741 на номер U133389663907
- Trojan.MbrLock.6 на номер U380679066133
- Trojan.WinLock.2741 на номер U162700889785
- Trojan.MbrLock.6 на номер U380689384245
- Trojan.MbrLock.6 на номер U380679057579
- Trojan.MbrLock.6 на номер U380689386397
- Trojan.MbrLock.6 на номер U380979024068
- Trojan.MbrLock.6 на номер U380632713229
- Trojan.MbrLock.6 на номер U380631095243
- Trojan.MbrLock.6 на номер U380984131575
- Trojan.MbrLock.6 на номер U380981161071
- Trojan.MbrLock.6 на номер U380684495438
- Trojan.MbrLock.6 на номер U380679066133
- Trojan.MbrLock.6 на номер U380635741911
- Trojan.WinLock.2741 на номер U211063599019
- Trojan.MbrLock.6 на номер 9258794615
- Trojan.WinLock.2741 на номер U341971846679
- Trojan.WinLock.2741 на номер U118473344683
- Trojan.MbrLock.6 на номер U380981161476
- Trojan.MbrLock.6 на номер 9258730117
- Trojan.Winlock.6492 на номер 79067307638
- Trojan.Winlock.6412 на номер 79879496471
- Trojan.MbrLock.6 на номер U380684499952
- Trojan.MbrLock.6 на номер 380984132662
- Trojan.MbrLock.6 на номер 380984178073
- Trojan.MbrLock.6 на номер U380930672341
- Trojan.MbrLock.6 на номер U380984148741
- Trojan.WinLock.2741 на номер U301462561680
- Trojan.MbrLock.6 на номер 380981243255
- Trojan.WinLock.2741 на номер U334866313621
- Trojan.MbrLock.6 на номер U380934330268
- Trojan.MbrLock.6 на номер U380684494851
- Trojan.MbrLock.6 на номер U380684529291
- Trojan.Winlock.6651 на номер 77025639091
- Trojan.WinLock.2741 на номер U343743345954
- Trojan.Winlock.6176 на номер 79171504291
- Trojan.MbrLock.6 на номер 380919262894
- Trojan.WinLock.2741 на номер U450308783108
- Trojan.MbrLock.6 на номер U380986427099
- Trojan.MbrLock.6 на номер U380689383757
- Trojan.MbrLock.6 на номер U380931455271
- Trojan.WinLock.2741 на номер U376801214066
- Trojan.WinLock.2741 на номер U268887020116
- Trojan.MbrLock.6 на номер U380981256738
- Trojan.MbrLock.6 на номер U380930756405
- Trojan.MbrLock.6 на номер 89178638392
- Trojan.Winlock.6492 на номер 79091677662
- Trojan.MbrLock.6 на номер U380934330286
- Trojan.MbrLock.6 на номер U380684497327
- Trojan.MbrLock.6 на номер U380986398261
- Trojan.MbrLock.6 на номер U380986427243
- Trojan.MbrLock.6 на номер U380689383991
- Trojan.MbrLock.6 на номер U380684497625
- Trojan.MbrLock.6 на номер U380984178177
- Trojan.MbrLock.6 на номер U380969113609
- Trojan.MbrLock.6 на номер U380984131536
- Trojan.MbrLock.6 на номер U380684496763
- Trojan.MbrLock.6 на номер 89179259609
- Trojan.WinLock.2741 на номер U311501858307
- Trojan.WinLock.5554 на номер 79171531152
- Trojan.MbrLock.6 на номер 89099645129
- Trojan.WinLock.6746 на номер R126061817850
- Dr.Web LiveCD 6.0.2 beta редактируем реестр
- Trojan.Winlock.6492 на номер 79670416903
- Trojan.Winlock.6312 на номер 9881847991
- Trojan.WinLock.2741 на номер U425045142106
- Trojan.MbrLock.6 на номер U380679066047
- Trojan.MbrLock.6 на номер 89653788568
- Trojan.MbrLock.6 на номер 380969126037
- Trojan.MbrLock.6 на номер 380930756274
- Trojan.MbrLock.6 на номер 380984178174
- Trojan.MbrLock.6 на номер 380984131760
- Trojan.MbrLock.6 на номер 380938345281
- Trojan.MbrLock.6 на номер 380684493459
- Trojan.Generic.7648728 на номер R422325390324
- Trojan.WinLock.2741 на номер U158400053920
- Trojan.MbrLock.6 на номер 380684497468
- Trojan.WinLock.2741 на номер 89614241462
- Trojan.WinLock.2741 на номер U346902283114
- Trojan.MbrLock.6 на номер 89036142309
- Trojan.MbrLock.6 на номер 380679066088
- Trojan.MbrLock.6 на номер 380679057846
- Trojan.MbrLock.6 на номер 380679057846
- Trojan.MbrLock.6 на номер 380975716299
- Trojan.MbrLock.6 на номер 380971829136
- Trojan.MbrLock.6 на номер 380930253296
- Trojan.MbrLock.6 на номер 380679073080
- Trojan.MbrLock.6 на номер 380679057786
- Trojan.MbrLock.6 на номер U380938337706
- Trojan.WinLock.2741 на номер U232683271942
- Trojan.Winlock.6412 на номер 79879154382
- Trojan.MbrLock.6 на номер 380963914694
- Trojan.MbrLock.6 на номер 380984131653
- Trojan.MbrLock.6 на номер 380930756397
- Trojan.MbrLock.6 на номер 380679065947
- Trojan.MbrLock.6 на номер 380930756331
- Trojan.MbrLock.6 на номер 380684493474
- Trojan.MbrLock.6 на номер 380969126461
- Trojan.MbrLock.6 на номер 380984132662
- Trojan.MbrLock.6 на номер 380984178073
- Trojan.MbrLock.6 на номер 380986427346
- Trojan.MbrLock.6 на номер 380679066181
- Trojan.WinLock.2741 на номер U363425519584
- Trojan.Winlock.6312 на номер 9881847966
- Trojan.Winlock.6412 на номер 79198021022
- Trojan.MbrLock.6 на номер 380969126325
- Trojan.MbrLock.6 на номер 380980554105
- Trojan.MbrLock.6 на номер 380679066133
- Trojan.WinLock.2741 на номер U760987506308
- Trojan.MbrLock.6 на номер 380984131653
- Trojan.WinLock.2741 на номер U381390042198
- Trojan.Winlock.6176 на номер 79139049389
- Trojan.Winlock.6312 на номер 9881858304
- Корректор-бизнесмен в печали 😉
- Trojan.MbrLock.6 на номер U380969113639
- Trojan.MbrLock.6 на номер U380684493662
- Trojan.MbrLock.6 на номер U380934330266
- Trojan.MbrLock.6 на номер U380632713287
- Trojan.MbrLock.6 на номер U380635810723
- Trojan.MbrLock.6 на номер U380684492779
- Trojan.WinLock.2741 на номер U243045499148
- Trojan.Winlock.6651 на номер 77058770114
- Trojan.MbrLock.6 на номер 89687152215
- Trojan.MbrLock.6 на номер U380938337706
- Trojan.MbrLock.6 на номер 380971292281
- Trojan.WinLock.2741 на номер U160695189217
- Trojan.WinLock.3333 на номер 89879395524
- Trojan.Winlock.6492 на номер 79060546657
- Trojan.Winlock.6312 на номер 9881854404
- Trojan.WinLock.2741 на номер U214544348197
- Trojan.Winlock.6312 на номер 7757235054
- Trojan.MbrLock.6 на номер 89037084353
- Trojan.MbrLock.6 на номер 89057074889
- Trojan.Winlock.6658 c текстом Department of justic…
- Trojan.MbrLock.6 на номер 380689360419
- Trojan.MbrLock.6 на номер U380938097066
- Trojan.WinLock.2741 на номер U130802468318
- Trojan.MbrLock.6 на номер U380939827909
- Trojan.MbrLock.6 на номер U380938372495
- Trojan.Winlock.6426 на номер 79879250514
- Trojan.Winlock.6651 на номер 380637310339
- Trojan.WinLock.2741 на номер U244464075419
- Пиво Bud
- Trojan.WinLock.6510 на номер 380665300919
Не вдається підключитися до домашньої мережі?
Інформація та інструкції з усунення несправностей при підключенні домашньої мережі в Windows 7.
Симптом:
![]() Стан значка підключення до бездротової мережі показує відсутність підключення
Стан значка підключення до бездротової мережі показує відсутність підключення
На карті мереж не відображається підключення до мереж або Інтернету

Якщо комп’ютер був раніше підключений домашньої мережі, однак зараз він до неї не підключений, виконайте такі дії, щоб спробувати виправити неполадку.
ПРИМІТКА. Наступні кроки передбачають, що мережа була налаштована раніше. Для отримання додаткових відомостей щодо налаштування мережі, див. розділ Налаштування простої домашньої мережі .
Перевірте з’єднання після виконання кожного кроку. Якщо проблему не усунуто, перейдіть до наступного кроку.
Крок 1: При бездротовому підключенні переконайтеся, що комп’ютер підключено до потрібної мережі
Якщо комп’ютер у минулому був підключений до мережі, він спробує повторно встановити з’єднання при виявленні бездротової мережі. Тим не менш, комп’ютер може бути підключений не до тієї мережі.
Клацніть значок Мережеве підключення ![]() в області повідомлень, щоб перевірити, підключені Чи бездротові мережі.
в області повідомлень, щоб перевірити, підключені Чи бездротові мережі.
Якщо комп’ютер підключений не до тієї мережі, клацніть рядок з ім’ям цієї мережі, потім натисніть кнопку Вимкнути. Клацніть рядок з ім’ям необхідної мережі, натисніть кнопку Підключитися.
Якщо комп’ютер підключено до потрібної мережі, переконайтеся, що налаштування безпеки відповідають потрібним параметрам і є пароль для доступу до мережі. Налаштування можна перевірити підключення в розділі Центр управління мережами і загальним доступом.
Крок 2: Перевірте підключення кабелів пристрої і скиньте налаштування пристрою модема або маршрутизатора
Виконайте наступні кроки, щоб перевірити підключення кабелів, скинути апаратне забезпечення і підключити комп’ютер до модему безпосередньо.
- Вимкніть комп’ютер.
- Від’єднайте всі кабелі, за винятком кабелів живлення, клавіатури, миші і монітора. Запишіть місце кожного кабельного з’єднання.
- Відключіть живлення маршрутизатора, кабельного / DSL-модему або комбінації маршрутизатора / модему і почекайте, поки згаснуть індикатори роботи.
- Відключіть всі кабелі від модему і маршрутизатора.
- Перевірте наявність погнутих або пошкоджених контактів на кінцях кабелів і всередині роз’ємів комп’ютера, маршрутизатора або модему. Перевірте наявність перегинів або пошкоджень в самому кабелі. Усуньте несправності кабелів з ознаками неполадки або замініть ці кабелі.
- Підключіть всі кабелі, крім шнурів живлення до модему і маршрутизатора.
- Підключіть комп’ютер до роз’єму на тильній стороні корпусу кабельного / DSL-модему або маршрутизатора за допомогою мережного кабелю (RJ45). Не проводьте кабелі поруч з динаміками і не перегинайте надлишки кабелю. По можливості використовуйте кабелі довжиною не більше 1,83 м. Переконайтеся, що для підключення маршрутизатора до комп’ютера використовується кабель відповідного типу (див. наступний малюнок).
ПРИМІТКА. Якщо використовується бездротове підключення, то його налаштування можна виконати пізніше після того, як буде встановлено, що підключення комп’ютера до Інтернет можливо по прямому мережевого кабельному з’єднанню.
Кабелі для підключення DSL-або кабельного модема до комп’ютера

1 – мережевий кабель RJ45 – Cat5/Cat6. Кабель цього типу використовується для підключення маршрутизатора / модему до мережевого порту комп’ютера.
2 – телефонний кабель RJ11. Не використовуйте цей кабель для підключення до комп’ютера.
3 – спеціальний телефонний кабель з 6 жилами. Не використовуйте кабель цього типу.
4 – кабель USB. Більшість маршрутизаторів / модемів підключаються за допомогою кабелю USB. Перш ніж використовувати кабель USB, приєднайте мережевий кабель RJ45. ЗАБОРОНЯЄТЬСЯ одночасне підключення кабелю USB і мережевого кабелю.
- Підключіть шнури живлення до модему і маршрутизатора і включіть їх.
- Почекайте, поки індикатори пристрою не стануть блимати як зазвичай або перестануть мигати. Для цього повинно знадобитися приблизно від 10 до 30 секунд. Якщо індикатор блимає дивним чином, або кілька індикаторів не горять, це є ознакою неполадки в наданні послуги Інтернет. Див опис комбінацій миготливих індикаторів в керівництві до широкосмугового пристрою й зверніться до свого провайдера у випадку виникнення неполадок.
- Після того, як індикатори на пристрої широкосмугового зв’язку замигають в нормальному режимі або будуть горіти постійно, увімкніть комп’ютер.
- Почекайте, поки Windows повністю завантажиться, після чого підключіться до Інтернету. Перейдіть на веб-вузол www.i-help.us . Якщо проблема з підключенням залишається, переходьте до наступного кроку.
Крок 3: Запустіть засіб “Діагностика мереж Windows”
Windows 7 контролює підключення до мережі та Інтернет. При виявленні неполадки відобразиться повідомлення про відсутність з’єднання або обмеженому підключенні і буде запитано дозвіл користувача на виконання діагностики неполадки. Натисніть OK, щоб дозволити Windows 7 виконати діагностику і відновити з’єднання.
Щоб вручну запустити діагностику, виконайте одну з таких дій:
Варіант 1
Клацніть правою кнопкою миші значок Мережеве підключення ![]() в області сповіщень на панелі завдань і виберіть пункт Усунення неполадок. Засіб діагностики мережі Windows виконає перевірку системи на наявність несправностей.
в області сповіщень на панелі завдань і виберіть пункт Усунення неполадок. Засіб діагностики мережі Windows виконає перевірку системи на наявність несправностей.
Усунення несправностей

Варіант 2
Натисніть кнопку Пуск ( ![]() ) І введіть мережу і загальний доступ в полі Знайти програми та файли. У результатах клацніть значок Центр управління мережами і загальним доступом.
) І введіть мережу і загальний доступ в полі Знайти програми та файли. У результатах клацніть значок Центр управління мережами і загальним доступом.
Запуск “Центру управління мережами і загальним доступом” з меню Пуск

Варіант 3
У Центрі управління мережами і загальним доступом клацніть символ у вигляді жовтого знака оклику ![]() або хреста червоного кольору
або хреста червоного кольору ![]() в області “Стан мережі”, щоб запустити засіб “Діагностика мережі Windows”.
в області “Стан мережі”, щоб запустити засіб “Діагностика мережі Windows”.
Стан мережі
Крок 4: Використовуйте засіб виправлення неполадок мережі та Інтернет
У Центрі управління мережами і загальним доступом в Windows 7 є засіб усунення неполадок мережі та інтернету, яке виконує перевірку на наявність несправностей в мережі і, якщо необхідно, виконує автоматичну корекцію програмних підключень. Використовуйте цей інструмент для перевірки та виправлення помилок підключення наступним чином:
- У Центрі управління мережами і загальним доступом клацніть пункт Усунення неполадок.
Усунення несправностей

Відкриється вікно програми “Засіб усунення неполадок мережі та Інтернет”.
Засіб усунення неполадок мережі та Інтернет

- Натисніть кнопку Підключення до Інтернет, щоб перевірити з’єднання з Інтернет.
- Щоб перевірити систему на наявність несправностей, дотримуйтесь інструкцій на екрані.
- Якщо проблема усунена, подальші дії не потрібні.
Якщо проблему не усунуто, поверніться в розділ “Засіб усунення неполадок мережі та Інтернет” та натисніть кнопку Мережевий адаптер, щоб перевірити адаптер.
Крок 5: У вікні “Диспетчер пристроїв” перевірте, чи включені адаптери мережі
- Натисніть кнопку Пуск (
 ) І введіть Диспетчер пристроїв в полі Знайти програми та файли. У результатах пошуку знайдіть і клацніть пункт Диспетчер пристроїв.
Відкриття вікна “Диспетчер пристроїв” з меню “Пуск”

- Двічі клацніть значок Мережеві адаптери.
Диспетчер пристроїв – Мережеві адаптери

- Перевірте стан апаратного забезпечення локальної мережі.
- Якщо поряд із значком мережевої карти є стрілка (
 ), Це означає, що даний пристрій відключено. Клацніть правою кнопкою миші рядок з ім’ям мережевого пристрою і виберіть пункт Увімкнути.
Включення апаратного забезпечення локальної мережі

ПРИМІТКА. Якщо плата локальної мережі не вказана в списку, виберіть у меню Дія пункт Оновити конфігурацію устаткування. Якщо мережева плата як і раніше не вказана в списку, перезавантажте комп’ютер, потім поверніться у вікно “Диспетчер пристроїв”. Windows 7 автоматично виявить пристрої та встановить драйвери при запуску системи.
- Після включення апаратного забезпечення локальної мережі перевірте підключення до мережі. Якщо підключення все ще не вдається встановити, спробуйте скористатися наступними корисними порадами, а також зробити кроки для усунення симптому Низька швидкість з’єднання або розриви підключення .
Інші дії:
- Перевстановіть оригінальне ПЗ та драйвери мережевих адаптерів комп’ютера.
- Перевірте налаштування брандмауера, щоб переконатися, що для оглядача відкритий доступ в мережу.
- Підключіть до мережі інший комп’ютер, щоб перевірити, чи відноситься неполадка тільки до одного ПК.
- Перевірте веб-сайти постачальників комп’ютера, мережевий плати, модему та / або маршрутизатора на наявність оновлень мікропрограмного забезпечення або драйверів.
- Зв’яжіться з представником постачальника послуг Інтернету або виробником модему, щоб проконсультуватися про додаткові заходи пошуку та усунення несправностей.
- Скиньте налаштування маршрутизатора до заводських. Більш детальна, що відноситься до конкретної моделі, інформація наведена в Посібнику користувача, що додається до маршрутизатора.
Не вдається підключитися до Інтернету?
Тут ми розміщуємо інструкції щодо діагностики та усунення несправностей підключення до Інтернету за допомогою домашньої мережі в Windows 7.
Симптоми несправності:
![]() Стан значка підключення до бездротової мережі – підключений до мережі, відсутній доступ до Інтернету
Стан значка підключення до бездротової мережі – підключений до мережі, відсутній доступ до Інтернету
Карта мережі не показує наявності доступу до Інтернету:
![]()
При спробі перегляду веб-сторінок відображаються повідомлення про помилки
o У вікні Internet Explorer неможливий перегляд ні однієї веб-сторінки.
o Автономний режим: З’єднання з Інтернетом недоступне.
o Відсутній підключення: Ви не підключені до жодної мережі.
Якщо комп’ютер може підключатися до мережі, але не до Інтернету, виконайте такі дії. Перевіряйте підключення до Інтернету після кожного кроку. Якщо проблему не усунуто, перейдіть до наступного кроку.
ПРИМІТКА. Виконання цих дій припускає, що мережа була налаштована раніше і є договір з постачальником послуг Інтернету. Для отримання додаткових відомостей щодо налаштування мережі, див. розділ Налаштування простої домашньої мережі .
Крок 1: При бездротовому підключенні переконайтеся, що комп’ютер підключено до потрібної мережі
Якщо комп’ютер у минулому був підключений до мережі, він спробує повторно встановити з’єднання при виявленні бездротової мережі. Тим не менш, комп’ютер може бути підключений не до тієї мережі.
Щоб визначити, з якою мережею встановлене з’єднання, а також вибрати потрібну мережу, виконайте такі дії:
Клацніть значок Мережеве підключення ![]() в області повідомлень, щоб перевірити, підключені Чи бездротові мережі.
в області повідомлень, щоб перевірити, підключені Чи бездротові мережі.
Якщо комп’ютер підключений не до тієї мережі, клацніть рядок з ім’ям цієї мережі, потім натисніть кнопку Вимкнути. Клацніть рядок з ім’ям необхідної мережі, натисніть кнопку Підключитися.
Після підключення комп’ютера до необхідної мережі перевірте наявність доступу в Інтернет.
Крок 2: Спробуйте запустити Internet Explorer без надбудов
Визначте, чи є джерелом несправностей зовнішні програми або вбудовувані модулі. Відкрийте Internet Explorer для тестування без вбудованих модулів:
- Натисніть Пуск ( ) І введіть команду add в області “Пошук програм та файлів”, потім клацніть рядок Internet Explorer (без вбудованих модулів).
Меню “Пуск” з посиланням на Internet Explorer (без вбудованих модулів)

- У вікні Internet Explorer відобразиться сторінка з текстом “Всі надбудови Internet Explorer відключені”.
- Введіть www.i-help.us в адресний рядок браузера та натисніть Enter.
- Виберіть одне з наступних дій в залежності від того, що відображається у вікні Internet Explorer:
Варіант 1
Якщо у вікні Internet Explorer відобразиться небудь веб-сторінка, комп’ютер підключений до Інтернет, і джерелом неполадок є один або кілька вбудованих модулів. Для усунення цієї неполадки, можливо, буде потрібно знайти і видалити шпигунське ПЗ (spyware), і видалити всі недавно встановлені рекламні програми (adware) і доповнення браузера.
Варіант 2
Якщо в Internet Explorer не відображаються веб-сторінки, або комп’ютер починає спроби набору номера для з’єднання, продовжуйте виконувати подальші кроки.
Крок 3: Скидання параметрів Інтернету
Для підготовки Windows до усунення несправностей і рішенню більшості проблем, пов’язаних з навігацією по Інтернет, виконайте скидання налаштувань Інтернет наступним чином:
- Закрийте всі вікна Internet Explorer.
- Натисніть кнопку Пуск ( ), Виберіть пункт Панель керування, потім Мережа й Інтернет.
Мережа та Інтернет

- Виберіть пункт Властивості оглядача.
Відкриється вікно “Властивості оглядача”.
- Клацніть вкладку Додатково та натисніть кнопку Скинути.
Кнопка “Скидання” на вкладці “Додатково” у вікні “Властивості оглядача”

Відкриється вікно “Скидання налаштувань Internet Explorer”.
- Прочитайте інформацію на екрані, встановіть прапорець у полі Видалити особисті настройки та натисніть Сброс.
Скидання установок Internet Explorer

- Після того, як Windows виконає скидання установок Internet Explorer, натисніть кнопку Закрити.
- Спробуйте підключитися до Інтернет і перейти на веб-сайт www.i-help.us . Якщо проблему не усунуто, перейдіть до наступного кроку.
Крок 4: Перевірте підключення кабелів пристрої і скиньте налаштування пристрою модема або маршрутизатора
Виконайте наступні кроки, щоб перевірити підключення кабелів, скинути апаратне забезпечення і підключити комп’ютер до модему безпосередньо.
- Вимкніть комп’ютер.
- Від’єднайте всі кабелі за винятком кабелю живлення, клавіатури, миші і монітора. Запам’ятайте роз’єми, до яких був підключений кожен з кабелів.
- Відключіть живлення маршрутизатора, кабельного / DSL-модему або комбінації маршрутизатора / модему і почекайте, поки згаснуть індикатори роботи.
- Відключіть всі кабелі від модему і маршрутизатора.
- Перевірте наявність погнутих або пошкоджених контактів на роз’ємах кабелів і комп’ютера, маршрутизатора або кабельного модема. Перевірте наявність перегинів або пошкоджень в самому кабелі. Усуньте несправності кабелів з ознаками неполадки або замініть ці кабелі.
- Підключіть всі кабелі, крім шнурів живлення до модему і маршрутизатора.
- Підключіть комп’ютер до роз’єму на тильній стороні корпусу кабельного / DSL-модему або маршрутизатора за допомогою мережного кабелю (RJ-45). Не проводьте кабелі поруч з динаміками і не перегинайте надлишки кабелю. Якщо можливо, використовуйте кабелі довжиною 1,83 метрів або менше. Переконайтеся, що для підключення маршрутизатора до комп’ютера використовується кабель відповідного типу (див. наступний малюнок).
ПРИМІТКА. Якщо використовується бездротове підключення, то його налаштування можна виконати пізніше, після того, як буде встановлено, що підключення комп’ютера до Інтернету можливо за прямим мережевого кабельному з’єднанню.
Кабелі для підключення DSL-або кабельного модема до комп’ютера
1 – мережевий кабель RJ45 – Cat5/Cat6. Кабель цього типу використовується для підключення маршрутизатора / модему до мережевого порту комп’ютера.
2 – телефонний кабель RJ11. Не використовуйте цей кабель для підключення до комп’ютера.
3 – спеціальний телефонний кабель з 6 жилами. Не використовуйте кабель цього типу.
4 – кабель USB. Більшість маршрутизаторів / модемів підключаються за допомогою кабелю USB. Перш ніж використовувати кабель USB, приєднайте мережевий кабель RJ45. ЗАБОРОНЯЄТЬСЯ одночасне підключення кабелю USB і мережевого кабелю.
- Під’єднайте шнур живлення до модему і маршрутизатора і включіть їх.
- Почекайте, поки індикатори пристрою не стануть блимати як зазвичай або перестануть мигати. Для цього повинно знадобитися приблизно від 10 до 30 секунд. Якщо індикатор блимає дивним чином, або кілька індикаторів не горять, це є ознакою неполадки в наданні послуги Інтернет. Див опис комбінацій миготливих індикаторів в керівництві до широкосмугового пристрою й зверніться до свого провайдера у випадку виникнення неполадок.
- Після того, як індикатори на пристрої широкосмугового зв’язку замигають в нормальному режимі або будуть горіти постійно, увімкніть комп’ютер.
- Почекайте, поки Windows повністю завантажиться, після чого підключіться до Інтернету. Перейдіть на веб-вузол www.i-help.us . Якщо неполадки з підключенням не вдається усунути, спробуйте скористатися наступними корисними порадами, після чого перейдіть в розділ Не вдається підключитися до домашньої мережі .
Інші дії:
- Перевірте налаштування брандмауера, щоб переконатися, що для оглядача відкритий доступ в мережу.
- Підключіть до мережі інший комп’ютер, щоб перевірити, чи відноситься неполадка тільки до одного ПК.
- Зв’яжіться з представником постачальника послуг Інтернету або виробником модема, щоб проконсультуватися про додаткові заходи пошуку та усунення неполадок.
- Скиньте налаштування маршрутизатора до заводських. Більш детальна, що відноситься до конкретної моделі, інформація наведена в Посібнику користувача, що додається до маршрутизатора.
Також можемо вам запропонувати послугу: Налаштування WiFi-роутерів . Наші спеціалісти допоможуть віддалено налаштувати ваш WiFi роутер та підкажуть оптимальні параметри для його роботи та безпеки.
Інсталяція та повторна інсталяція Windows 7
Під час інсталяції Windows 7 можна вибрати один із двох варіантів.
- Оновлення. Унаслідок вибору цього варіанта поточну версію Windows буде замінено на Windows 7, а файли, настройки та програми буде збережено на вашому комп’ютері.
- Вибіркова. Після вибору цього варіанта поточну версію Windows буде замінено на Windows 7, файли, настройки та програми при цьому не зберігаються. Тому її інколи називають чистою інсталяцією.
У цій статті наведено докладні інструкції щодо інсталяції Windows 7 та повторної інсталяції Windows 7.
Основні способи інсталяції Windows 7
Перш ніж почати інсталяцію Windows 7
Щоб зберегти час і запобігти виникненню проблем під час інсталяції, виконайте наведені нижче дії.
- Знайдіть свій ключ продукту. Відповідний ключ продукту можна знайти на комп’ютері або обгортці інсталяційного диска в пакеті Windows чи в підтвердженні електронною поштою, якщо Windows 7 придбано й завантажено в Інтернеті. Наклейка із ключем продукту виглядає так:КЛЮЧ ПРОДУКТУ: XXXXX-XXXXX-XXXXX-XXXXX-XXXXXПерейдіть на веб-сайт Microsoft, щоб переглянути приклади наклейок із ключем продукту.
- Запишіть ім’я комп’ютера. Якщо комп’ютер наразі підключено до мережі, ім’я комп’ютера може знадобитися після завершення інсталяції Windows 7. Щоб отримати додаткові відомості, див. Пошук імені комп’ютера.
- Створіть резервну копію файлів. Резервну копію файлів можна зберегти на зовнішньому жорсткому диску, DVD- чи компакт-диску або в мережній папці. Рекомендуємо використовувати засіб Windows для міграції даних, щоб створити резервні копії всіх файлів і настройок. Щоб отримати додаткові відомості, перейдіть на веб-сторінку засобу Windows для міграції даних.
- Завантажте та запустіть безкоштовний “Порадник з оновлення до Windows 7”. Цей засіб дозволить виявити потенційні проблеми сумісності з обладнанням, пристроями або програмним забезпеченням комп’ютера, які можуть вплинути на процес інсталяції Windows 7. Щоб отримати додаткові відомості про засіб, перейдіть на веб-сторінку Порадника з оновлення до Windows 7.
- Виберіть, яку версію Windows 7 інсталювати: 32- чи 64-розрядну. Пакет інсталяційного диска Windows 7 містить 32- і 64-розрядну версії Windows 7. Завантажуючи Windows 7 із Microsoft Store, необхідно вибрати, яку версію завантажувати: 32- чи 64-розрядну. Щоб отримати допомогу із вибором версії для інсталяції, перейдіть на сторінку 32- і 64-розрядна система: запитання й відповіді.
- Оновіть антивірусну програму, запустіть її, а потім вимкніть. Після інсталяції Windows не забудьте увімкнути знову антивірусну програму або встановити нове антивірусне програмне забезпечення, сумісне з Windows 7.
- Підключіться до Інтернету. Переконайтеся, що ваше підключення до Інтернету працює належним чином, щоб ви могли отримати останні оновлення, наприклад, оновлення безпеки та драйверів, які можуть допомогти під час інсталяції. Проте інсталювати Windows 7 можна й без підключення до Інтернету.
Використання параметра інсталяції “Оновлення”
Параметр “Оновлення” зберігає файли, настройки та програми поточної версії Windows. Щоб дізнатися докладніше, які версії Windows може бути оновлено Windows 7, див. Оновлення до Windows 7: запитання й відповіді на веб-сайті Windows.
Примітки
- Якщо для входу в систему використовується сканер відбитків пальців або інший пристрій біометричної автентифікації, перед початком оновлення запишіть пароль. Під час першого після оновлення запуску Windows 7 необхідно ввести ім’я користувача та пароль для входу в систему.
- Деякі програми, зокрема Windows Mail і Outlook Express більше не входять до складу Windows 7. Якщо досі ви використовували поштову програму Windows Mail або Outlook Express, після інсталяції Windows 7 потрібно інсталювати нову поштову програму, щоб переглядати свої повідомлення, надсилати й отримувати електронну пошту. Щоб отримати додаткові відомості про програми, які можна використовувати, див. Шукаєте Windows Mail? на веб-сайті Windows.
Інсталяція Windows 7 за допомогою параметра “Оновлення”
- Увімкніть комп’ютер для звичайного запуску Windows. (Неможливо виконати оновлення, запустивши або завантаживши комп’ютер за допомогою інсталяційного носія Windows 7.)
- Після запуску Windows виконайте одну з наведених нижче дій.
- Якщо ви завантажили Windows 7, знайдіть завантажений інсталяційний файл і двічі клацніть його.
-
Якщо Windows 7 міститься на інсталяційному диску, вставте його в дисковод комп’ютера. Програма інсталяції запуститься автоматично. Якщо цього не відбувається, натисніть кнопку Пуск,
 , виберіть пункт Комп’ютер, двічі клацніть пристрій для читання DVD-дисків, щоб відкрити інсталяційний диск Windows 7, а потім двічі клацніть файл setup.exe.
 -
Якщо інсталяційні файли Windows 7 завантажено на флеш-пам’ять USB, вставте її в комп’ютер. Програма інсталяції запуститься автоматично. Якщо цього не відбувається, натисніть кнопку Пуск, виберіть Комп’ютер, двічі клацніть назву флеш-пам’яті USB, а потім – setup.exe (також двічі).
- На сторінці Інсталяція Windows виберіть варіант Інсталювати зараз.
- Зі сторінки Отримати важливі оновлення для інсталяції радимо завантажити останні оновлення, щоб забезпечити успішну інсталяцію та захистити комп’ютер від загроз. Щоб отримати оновлення для інсталяції, потрібно мати підключення до Інтернету.
- На сторінці Ознайомитися з умовами ліцензійної угоди виберіть варіант Я приймаю умови ліцензійної угоди, якщо ви приймаєте умови ліцензії, а потім клацніть Далі.
- На сторінці Який тип інсталяції слід використати? виберіть параметр Оновити, щоб розпочати оновлення. Можливо, буде відображено звіт про сумісність.
Сторінка “Який тип інсталяції слід використати?”
- Дотримуйтесь інструкцій, щоб завершити інсталяцію Windows 7.
Примітка
Спільне використання принтерів
Якщо ви спільно використовували принтери у Windows Vista, необхідно виконати наведені нижче дії, щоб знову надати до них спільний доступ.
-
Натисніть кнопку Пуск, а потім виберіть Пристрої та принтери.
- Клацніть правою кнопкою миші принтер, доступ до якого потрібно відкрити, і виберіть пункт Властивості принтера.
- Відкрийте вкладку Спільний доступ, установіть прапорець поруч із пунктом Спільний доступ до цього принтера та натисніть кнопку OK.Якщо інші комп’ютери все ще не мають доступу до принтера, видаліть принтер у їх налаштуваннях, а потім знову додайте його.
Використання параметра “Вибіркова інсталяція” без форматування жорсткого диска
Унаслідок вибору параметра “Вибіркова інсталяція” буде встановлено нову копію Windows 7 на вказаний вами розділ. Під час інсталяції видаляються файли, програми та настройки користувача.
Створіть резервну копію всіх потрібних файлів і настройок, щоб відновити їх після інсталяції. Необхідно буде повторно інсталювати потрібні програми, тому переконайтеся, що у вас є інсталяційні диски та ключі продуктів для програм, які використовуватимуться у Windows 7, або інсталяційні файли програм, завантажених з Інтернету.
Примітки
- Деякі програми, зокрема Windows Mail і Outlook Express більше не входять до складу Windows 7. Якщо досі ви використовували поштову програму Windows Mail або Outlook Express, після інсталяції Windows 7 потрібно інсталювати нову поштову програму, щоб переглядати свої повідомлення, надсилати й отримувати електронну пошту. Щоб отримати додаткові відомості про програми, які можна використовувати, див. Шукаєте Windows Mail? на веб-сайті Windows.
- Якщо ви використовуєте 64-розрядну версію Windows, але плануєте встановити 32-розрядну версію Windows 7, то програми, розроблені для 64-розрядних операційних систем, можливо, не функціонуватимуть. Щоб отримати додаткові відомості, відвідайте веб-сайт розробника програмного забезпечення або перейдіть на веб-сторінку Центру сумісності Windows 7, щоб здійснити пошук обладнання та програмного забезпечення, перевіреного на сумісність із 32- і 64-розрядними версіями Windows 7.
- Якщо не форматувати жорсткий диск під час інсталяції, файли даних буде збережено в папці Windows.old на розділі, де встановлено Windows 7. Однак все одно знадобиться створити резервну копію файлів. Якщо у вас є зашифровані файли даних, можливо, ви не зможете отримати до них доступ після інсталяції Windows 7. Якщо після інсталяції Windows 7 файли даних було відновлено з резервних копій, можна видалити папку Windows.old.
Використання параметра “Вибіркова інсталяція” без форматування жорсткого диска для інсталяції Windows 7
- Увімкніть комп’ютер для звичайного запуску Windows, а потім виконайте одну з наведених нижче дій.
- Якщо ви завантажили Windows 7, знайдіть завантажений інсталяційний файл і двічі клацніть його.
-
Якщо Windows 7 міститься на інсталяційному диску, вставте його в дисковод комп’ютера. Програма інсталяції запуститься автоматично. Якщо цього не відбувається, натисніть кнопку Пуск,, виберіть пункт Комп’ютер, двічі клацніть пристрій для читання DVD-дисків, щоб відкрити інсталяційний диск Windows 7, а потім двічі клацніть файл setup.exe.
-
Якщо інсталяційні файли Windows 7 завантажено на флеш-пам’ять USB, вставте її в комп’ютер. Програма інсталяції запуститься автоматично. Якщо цього не відбувається, натисніть кнопку Пуск, виберіть Комп’ютер, двічі клацніть ім’я диска, а потім – setup.exe (також двічі).
- На сторінці Інсталяція Windows дотримуйтесь усіх вказівок, які з’являються, потім натисніть кнопку Інсталювати зараз.
- На сторінці Отримати важливі оновлення для інсталяції рекомендуємо отримати останні оновлення, щоб забезпечити успішну інсталяцію та захистити комп’ютер від загроз. Щоб отримати оновлення для інсталяції, потрібно мати підключення до Інтернету.
- На сторінці Ознайомитися з умовами ліцензійної угоди виберіть варіант Я приймаю умови ліцензійної угоди, якщо ви приймаєте умови ліцензії, а потім клацніть Далі.
- На сторінці Який тип інсталяції слід використати? виберіть варіант Додатково.
- На сторінці Куди слід інсталювати Windows? виберіть розділ із попередньою версією Windows (найчастіше це диск C: комп’ютера), після чого клацніть Далі.
- У діалоговому вікні Windows.old клацніть OK.
- Виконайте подальші вказівки із завершення інсталяції Windows 7, включно із присвоєнням імені комп’ютера та настроюванням початкового облікового запису користувача.
Примітка
Використання параметра “Вибіркова інсталяція” та форматування жорсткого диска
Форматування жорсткого диска під час вибіркової інсталяції Windows 7 призведе до видалення всіх даних розділу, форматування якого здійснюється, зокрема файлів, настройок і програм.
Створіть резервну копію всіх потрібних файлів і настройок, щоб відновити їх після інсталяції. Необхідно буде повторно інсталювати потрібні програми, тому переконайтеся, що у вас є інсталяційні диски та ключі продуктів для програм, які використовуватимуться у Windows 7, або інсталяційні файли програм, завантажених з Інтернету.
Примітки
- Якщо використовується версія Windows 7 для оновлення, не використовуйте програмне забезпечення інших розробників для форматування жорсткого диска перед інсталяцією Windows 7. Натомість просто дотримуйтесь інструкцій, наведених у цьому розділі.
- Деякі програми, зокрема Windows Mail і Outlook Express більше не входять до складу Windows 7. Якщо досі ви використовували поштову програму Windows Mail або Outlook Express, після інсталяції Windows 7 потрібно інсталювати нову поштову програму, щоб переглядати свої повідомлення, надсилати й отримувати електронну пошту. Щоб отримати додаткові відомості про програми, які можна використовувати, див. Шукаєте Windows Mail? на веб-сайті Windows.
- Якщо ви використовуєте 64-розрядну версію Windows, але плануєте встановити 32-розрядну версію Windows 7, то програми, розроблені для 64-розрядних операційних систем, можливо, не функціонуватимуть. Щоб отримати додаткові відомості, відвідайте веб-сайт розробника програмного забезпечення або перейдіть на веб-сторінку Центру сумісності Windows 7, щоб здійснити пошук обладнання та програмного забезпечення, перевіреного на сумісність із 32- і 64-розрядними версіями Windows 7.
Використання параметра “Вибіркова інсталяція” та форматування жорсткого диска для інсталяції Windows 7
Щоб відформатувати жорсткий диск під час інсталяції Windows 7, запустіть або завантажте комп’ютер за допомогою інсталяційного диска Windows 7 або флеш-пам’яті USB.
- Увімкніть комп’ютер для звичайного запуску Windows, вставте інсталяційний диск Windows 7 або флеш-пам’ять USB, а потім вимкніть комп’ютер.
- Перезавантажте комп’ютер.
- Натисніть будь-яку клавішу після появи відповідного запиту й дотримуйтеся інструкцій, що з’являтимуться на екрані.
- На сторінці Інсталяція Windows укажіть потрібну мову й інші налаштування, а потім клацніть Далі.Якщо сторінка Інсталяція Windows і запит натиснути будь-яку клавішу не відображаються, можливо, знадобиться змінити деякі системні настройки. Щоб дізнатися, як це зробити, див. Запуск комп’ютера з інсталяційного диска Windows 7 або USB флеш-пам’яті.
- На сторінці Ознайомитися з умовами ліцензійної угоди виберіть варіант Я приймаю умови ліцензійної угоди, якщо ви приймаєте умови ліцензії, а потім клацніть Далі.
- На сторінці Який тип інсталяції слід використати? виберіть варіант Вибіркова інсталяція.
- На сторінці Куди слід інсталювати Windows? виберіть варіант Параметри диска (додатково).
- Клацніть розділ, який необхідно змінити, виберіть потрібний параметр форматування та дотримуйтеся наведених інструкцій.
- Після завершення форматування клацніть Далі.
- Виконайте подальші вказівки із завершення інсталяції Windows 7, включно із присвоєнням імені комп’ютера та настроюванням початкового облікового запису користувача.
Примітки
- Якщо версія Windows 7 для оновлення використовується на комп’ютері без інстальованої операційної системи, можливо, її не вдасться активувати. Версія для оновлення потребує наявності Windows XP або Windows Vista на комп’ютері для активації Windows 7. Під час інсталяції поле з ключем продукту потрібно залишити пустим. Щоб активувати Windows 7, перейдіть на веб-сайт Служби підтримки Microsoft. Щоб отримати додаткові відомості, див. Помилка активації Windows 7: недійсний ключ продукту і Помилка активації Windows 7: 0xC004F061.
-
Можливо, після завершення інсталяції Windows 7 знадобиться оновити драйвери. Щоб зробити це, натисніть кнопку Пуск, виберіть Усі програми, а потім – Windows Update. Якщо на веб-сайті Windows Update немає потрібного драйвера, див. Оновлення драйвера устаткування, яке працює неправильно або перейдіть на веб-сторінку Центру сумісності Windows 7.
Використання параметра “Вибіркова інсталяція”, якщо операційну систему не встановлено
Унаслідок вибору параметра “Вибіркова інсталяція” буде встановлено нову копію Windows 7 на вказаний вами розділ. Під час інсталяції видаляються файли, програми та настройки користувача. Якщо розділ містить будь-які файли, перш ніж продовжити, створіть резервну копію.
Інсталяція Windows 7 на комп’ютері без операційної системи
Для цього необхідно запустити або завантажити комп’ютер за допомогою інсталяційного диска Windows 7 або флеш-пам’яті USB.
- Увімкніть комп’ютер, вставте інсталяційний диск Windows 7 або флеш-пам’ять USB, а потім вимкніть комп’ютер.
- Повторно запустіть комп’ютер.
- Натисніть будь-яку клавішу після появи відповідного запиту та дотримуйтесь інструкцій, які з’являтимуться на екрані.
- На сторінці Інсталяція Windows укажіть потрібну мову й інші настройки, а потім клацніть Далі.Якщо сторінка Інсталяція Windows і запит щодо натиснення будь-якої клавіші не відображаються, можливо, знадобиться змінити деякі системні настройки. Щоб дізнатися, як це зробити, див. Запуск комп’ютера з інсталяційного диска Windows 7 або USB флеш-пам’яті.
- На сторінці Ознайомитися з умовами ліцензійної угоди виберіть варіант Я приймаю умови ліцензійної угоди, якщо ви приймаєте умови ліцензії, а потім клацніть Далі.
- На сторінці Який тип інсталяції слід використати? виберіть варіант Вибіркова інсталяція.
- На сторінці Куди слід інсталювати Windows?, укажіть розділ, де потрібно інсталювати Windows 7, або виберіть Вільне місце, якщо розділи відсутні, а потім клацніть Далі.Якщо з’явиться діалогове вікно з інформацією про те, що Windows може створити додаткові розділи для системних файлів, або вибраний розділ містить файли для відновлення чи інші типи файлів від виробника вашого комп’ютера, натисніть кнопку OK.
- Виконайте подальші вказівки із завершення інсталяції Windows 7, включно із присвоєнням імені комп’ютера та настроюванням початкового облікового запису користувача.
Примітки
- Якщо версія Windows 7 для оновлення використовується на комп’ютері без інстальованої операційної системи, можливо, її не вдасться активувати. Версія для оновлення потребує наявності Windows XP або Windows Vista на комп’ютері для активації Windows 7. Під час інсталяції поле з ключем продукту потрібно залишити пустим. Щоб активувати Windows 7, перейдіть на веб-сайт Служби підтримки Microsoft. Щоб отримати додаткові відомості, див. Помилка активації Windows 7: недійсний ключ продукту і Помилка активації Windows 7: 0xC004F061.
-
Можливо, після завершення інсталяції Windows 7 знадобиться оновити драйвери. Щоб зробити це, натисніть кнопку Пуск, виберіть Усі програми, а потім – Windows Update. Якщо на веб-сайті Windows Update немає потрібного драйвера, див. Оновлення драйвера устаткування, яке працює неправильно або перейдіть на веб-сторінку Центру сумісності Windows 7.
Інсталяція 64-розрядної версії Windows 7 на комп’ютері під керуванням 32-розрядної версії Windows
Перш ніж почати, переконайтеся, що комп’ютер підтримує 64-розрядну версію Windows. Щоб отримати додаткові відомості, див. 32- і 64-розрядна система: запитання й відповіді.
Унаслідок вибору параметра “Вибіркова інсталяція” буде встановлено нову копію Windows 7 на вказаний вами розділ. Під час інсталяції видаляються файли, програми та настройки користувача.
Створіть резервну копію всіх потрібних файлів і настройок, щоб відновити їх після інсталяції. Необхідно буде повторно інсталювати потрібні програми, тому переконайтеся, що у вас є інсталяційні диски та ключі продуктів для програм, які використовуватимуться у Windows 7, або інсталяційні файли програм, завантажених з Інтернету.
Примітки
- Деякі програми, зокрема Windows Mail і Outlook Express більше не входять до складу Windows 7. Якщо досі ви використовували поштову програму Windows Mail або Outlook Express, після інсталяції Windows 7 потрібно інсталювати нову поштову програму, щоб переглядати свої повідомлення, надсилати й отримувати електронну пошту. Щоб отримати додаткові відомості про програми, які можна використовувати, див. Шукаєте Windows Mail? на веб-сайті Windows.
- Якщо не форматувати жорсткий диск під час інсталяції, файли даних буде збережено в папці Windows.old у розділі, у який інстальовано Windows 7. Однак все одно потрібно створити резервну копію файлів. Якщо у вас є зашифровані файли даних, можливо, ви не зможете отримати до них доступ після інсталяції Windows 7. Якщо після інсталяції Windows 7 файли даних було відновлено з резервних копій, можна видалити папку Windows.old.
Інсталяція 64-розрядної версії Windows 7 на комп’ютері під керуванням 32-розрядної версії Windows
Для цього необхідно запустити або завантажити комп’ютер за допомогою інсталяційного диска Windows 7 або флеш-пам’яті USB.
- Увімкніть комп’ютер для звичайного запуску Windows, вставте інсталяційний диск Windows 7 або флеш-пам’ять USB, а потім вимкніть комп’ютер.
- Повторно запустіть комп’ютер.
- Натисніть будь-яку клавішу після появи відповідного запиту та дотримуйтесь інструкцій, які з’являтимуться на екрані.
- На сторінці Інсталяція Windows укажіть потрібну мову й інші настройки, а потім клацніть Далі.Якщо сторінка Інсталяція Windows і запит щодо натиснення будь-якої клавіші не відображаються, можливо, знадобиться змінити деякі системні настройки. Щоб дізнатися, як це зробити, див. Запуск комп’ютера з інсталяційного диска Windows 7 або USB флеш-пам’яті.
- На сторінці Ознайомитися з умовами ліцензійної угоди виберіть варіант Я приймаю умови ліцензійної угоди, якщо ви приймаєте умови ліцензії, а потім клацніть Далі.
- На сторінці Який тип інсталяції слід використати? виберіть варіант Вибіркова інсталяція.
- На сторінці Куди слід інсталювати Windows? виберіть розділ із попередньою версією Windows (найчастіше це диск C: комп’ютера), після чого клацніть Далі.
- У діалоговому вікні Windows.old натисніть OK.
- Виконайте подальші вказівки із завершення інсталяції Windows 7, включно із присвоєнням імені комп’ютера та настроюванням початкового облікового запису користувача.
Примітка
Повторна інсталяція Windows 7
Повторно інсталювати Windows 7 можна за допомогою засобу відновлення на панелі керування в розділі Додаткові методи відновлення. Цей метод дозволяє повторно інсталювати Windows 7 за допомогою образу для відновлення, який надається виробником комп’ютера, або оригінальних інсталяційних файлів Windows 7. Необхідно переінсталювати всі додані програми та відновити всі файли з резервної копії. Щоб отримати додаткові відомості, див. Вибір додаткового методу відновлення.
Якщо Windows 7 взагалі не запускається, можна повторно інсталювати Windows за допомогою оригінального інсталяційного диска Windows 7. Для цього дотримуйтесь інструкцій, зазначених у розділі “Використання параметра “Вибіркова інсталяція” та форматування жорсткого диска”, наведеного вище в цій темі.
Примітка
Якщо можливо, перед повторною інсталяцією Windows 7 створіть резервну копію файлів. Це слід зробити в разі повторної інсталяції Windows 7 на розділ жорсткого диска, навіть якщо особисті файли містяться на іншому розділі. Наприклад, за наявності зашифрованих файлів, після переінсталяції Windows може не вдатись отримати до них доступ. Під час вибіркової інсталяції буде замінено поточну версію Windows 7 і видалено всі особисті файли.
Як придбати Windows 7
ОС Windows 7 можна придбати в місцях роздрібної торгівлі. Windows 7 також може бути попередньо інстальовано на комп’ютері, який ви купуєте. У деяких країнах або регіонах Windows 7 можна придбати в Інтернеті. Це простий спосіб інсталювати Windows 7 на нетбуці або іншому комп’ютері, який не обладнано DVD-дисководом.
Додаткові відомості про те, як отримати Windows 7 у вашій країні чи регіоні, див. на веб-сторінці Крамниця.
Примітки
- У деяких країнах або регіонах Windows 7 постачається в двох версіях: оновлення та повна версія. Щоб отримати додаткові відомості про версії, доступні для вашої країни або регіону, перейдіть на сторінку Магазин.
- Якщо ви придбали копію Windows 7 для оновлення, необхідно інсталювати Windows 7 на комп’ютер під керуванням Windows XP або Windows Vista. Щоб отримати додаткові відомості, перегляньте сторінку Оновлення до Windows 7: запитання й відповіді на веб-сайті Windows.
- Пакет інсталяційного диска Windows 7 містить 32- і 64-розрядну версії Windows 7. Завантажуючи Windows 7 із Microsoft Store, необхідно вибрати, яку версію завантажувати: 32- чи 64-розрядну. Щоб отримати допомогу із вибором версії для інсталяції, перейдіть на сторінку 32- і 64-розрядна система: запитання й відповіді.
Ви не можете інсталювати Windows на ПК ? Не знаєте який віндовс – Віста 7 або Windows XP купляти? Не знаєте, як почати інсталяцію Windows 7 або Windows XP в Ужгороді, Мукачево чи Рахові? Професійну допомогу у інсталюванні Windows 7 чи XP Вам нададуть майстри нашого сервісного центру. Щоб відновити неробочу операційну чи встановити новий Windows, викличте майстра по телефону +38(097) 966-18-03 . Якщо у вас виникли якісь труднощі при оновленні Windows то ви можете звернутися за допомогою до наших спеціалістів звернувшись по телефону +380979661803 , чи заповнити онлайн форму комп’ютерної допомоги.
Вам необхідна допомога комп'ютерного фахівця? Проблеми з комп'ютером або ноутбуком? Наша компанія надає широкий спектр послуг. Обслуговування комп'ютерів і комп'ютерна допомога в Закарпатті та м.Ужгороді. Будь-який ремонт і налаштування комп'ютерів, ноутбуків і локальних мереж.

